This post may contain affiliate links. Please read our disclosure policy. As an Amazon Associate, I earn from qualifying purchases.
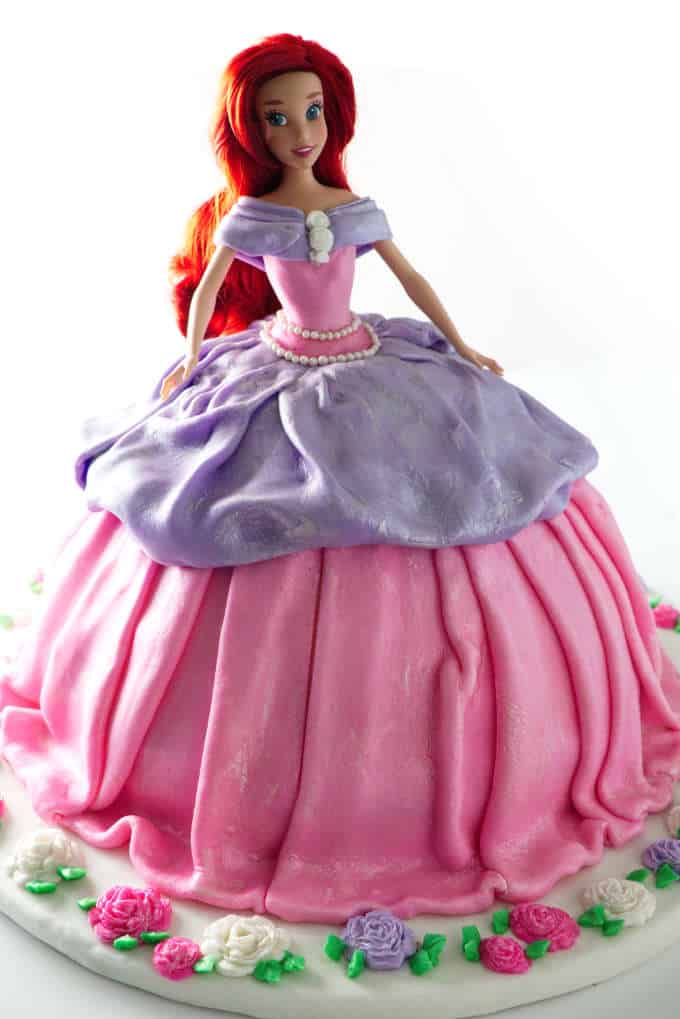
This Barbie cake is perfect for any little girl who loves Barbie dolls. The cake is the dress for the doll and it is decorated with marshmallow fondant. Read on and learn how you can make your own DIY Barbie doll cake for your special little girl.
If you aren’t experienced with fondant, this is a great cake design to try. Since dresses can be crumpled, pleated, and wrinkled, you don’t have to be perfect and precise with the fondant. As a matter of fact, I intentionally made folds in the fondant to resemble a pleated ball gown.
I have to say, fondant can be a bit challenging if you have never worked with it before. The more simple a cake design, the more time it usually takes me.
For instance, this Vine and Succulent wedding cake only has a few decorations on it. The rest of the cake was supposed to be smooth and pristine looking. You can see I had trouble getting the smooth and pristine part down. There are some bumps and bubbles in the fondant that I couldn’t get out and I couldn’t hide with decorations.
You can see my imperfections even better in this lace appliqué design. The top portion of the cake isn’t supposed to be lumpy and bumpy but it was the best I could do at the time.
Easier fondant cakes:
Fondant cake designs are a little less challenging for me when the cake is supposed to have texture, lines, and decorations that can cover imperfections. This wine barrel cake has a lot of texture which hides all the flaws and of course, the grapes hide even more problems. Then there is this fashion cake. The ruffles and pearls cover a lot of problems.
This Barbie doll cake falls under one of the less stressful cake designs that I have made. I didn’t even plan it out very much. I just figured I would start draping the fondant and see where it would take me.
If you want to make this cake I will tell you how I did it and all the supplies I used. Check out the video to see it in the process.
Supplies you need for this Barbie cake.
- 10-inch cake board
- 14-inch cake drum
- 10-inch round cake pan
- 9-inch round cake pan
- 8-inch round cake pan
- 6-inch round cake pan
- 2 batches of marshmallow fondant
- Pearl luster dust (this makes the dress look shiny)
- Sugar dragees
- buttercream frosting
- silicone mold for fondant roses
- Barbie doll (I used Ariel instead of Barbie)
Watch the video to see how I put this Barbie doll cake together. Scroll to the bottom to find a printable instruction card.
Make some things in advance.
I can’t throw a cake like this together in one day. Since I have a day job, my time is limited so I have to plan everything in advance. I try to make all the components ahead of time so that when it is time to decorate the cake, that is all I have to do. Just decorate!
Make the fondant:
First I made the marshmallow fondant 10 days ahead of time. You could actually make the marshmallow fondant 3 to 4 weeks in advance if you want. That stuff has so much sugar in it, it will last for a long time. The most important thing about making the fondant is to prevent it from drying out.
When I make fondant in advance, I coat it with vegetable shortening then I wrap it several times in plastic wrap and put it in a ziplock bag. Sometimes I even seal it in a food vacuum sealer to get out all the air. That is seriously the best way to keep fondant from drying out so if you have one, use it for your fondant.
When you make your fondant, make all the colors you plan to use for the Barbie cake dress. I only used 3 colors, white, pink, and lavender.
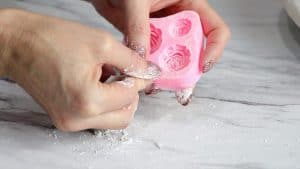
Make the roses:
If you want to decorate the cake with the little molded roses, then make them ahead of time, it will save you quite a bit of time. You could make them 7 to 10 days in advance and let them dry out.
I had planned to use the molded roses on the gown. I figured the little roses would cover any cracks and flaws that I knew I would have. You won’t see it in the video, but I had started to put the roses on the dress and I just did not like it so I scrapped the plan. Instead, I used the roses on the cake drum.
Cover the cake drum:
Cake drums are durable, heavy duty bases for cakes. They are usually about 1/2 inch thick and already have a nice water-resistant cover on them. I chose to cover the whole thing with a layer of white fondant instead of using the shiny surface that it came with.
If you want to cover the drum with fondant then that is another task you can do 7 to 10 days in advance. The fondant will just dry out on the cake drum and be even easier to use. I had planned to put a 1/2 inch ribbon around the edge of the cake drum but I totally forgot. If you want a nice finished look, get a 1/2 inch ribbon and secure it around the edge.
Make the filling:
I don’t know about you, but I like cakes filled with ooey- gooey-yummy fillings. The decadent, creamy filling in cakes is my favorite part of the cake. Unfortunately, when you layer cakes as tall as this Barbie cake, thick creamy fillings can make the layers slide around. For that reason, I made a thick, stable filling that I knew would hold the layers together. It is an easy vanilla cake filling that uses instant pudding mix.
I made the filling two days in advance along with the frosting and simple syrup. It doesn’t take long to whip up frosting, syrup, and filling but making them all in advance helps me manage my time better. It also helps me put my focus on decorating the cake when it is time to put all the components together.
The filling that I mentioned above is a creamy, mousse-like, vanilla filling that tastes a lot like the filling you would find in a Costco cake. The filling consists of cream cheese, cream, powdered sugar, and instant vanilla pudding. It is one of the few recipes that I use a pre-packaged food item like instant pudding. It is a very stable filling and I knew it would hold up well in the cake.
I would warn you against using cake fillings that are runny or slippery. A thick American buttercream or a very thick filling that acts more like ‘glue’ will work best. Also, make sure you don’t put too much filling between the layers. Spread it on in a thin layer about 1/4 inch thick.
Spreading on too much filling is a sure way to create a cake disaster and have half of the cake slide off.
Bake the cakes:
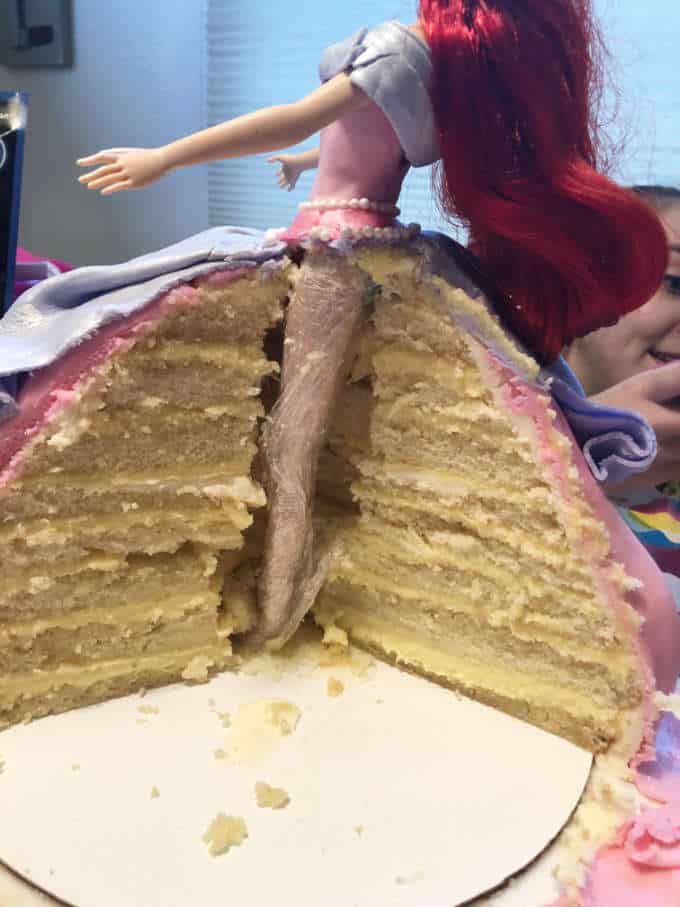
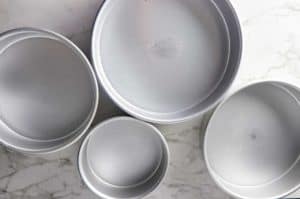
I used 4 cakes in graduating sizes.
- 10-inch
- 9-inch
- 8-inch
- 6-inch
I choose a vanilla sponge cake and made 3 separate batches. The first batch made one 10-inch cake and about 6 cupcakes.
The second batch made a 9-inch cake and about a dozen cupcakes.
Finally, the third batch made the 8-inch and the 6-inch cakes plus about 6 cupcakes.
I only have one oven so baking the cakes took a few hours. Since I knew it would take a while to bake all the cakes, I made them 5 days in advance. Once they were cool, I wrapped them in plastic wrap and placed them in the freezer.
Make the frosting:
I made the buttercream frosting two days in advance. Once it was whipped up, I spread it out in a flat rectangle on top of some plastic wrap then wrapped it up and stuck it in the fridge.
If you store frosting in the fridge, it gets firm and difficult to work with. You need to give it time to sit out at room temperature before you use it. By storing it in a flat rectangular disk, it will soften up much faster.
Make the sugar syrup:
Since I choose a sponge cake, I decided to soak the cake with a simple syrup. That’s one of the neat things about sponge cakes, they can hold a fair amount of syrup without getting soggy. The syrup helps keep the cake moist and adds flavor to the cake.
I made the syrup on the same evening that I made the frosting. When I make syrup for a cake, I cook the syrup longer than most people. If you cook the syrup to about 200°F it will be a bit thicker than traditional simple syrup but still thin enough to drizzle over the cake. The thickened syrup is an extra safeguard so that the cake doesn’t feel too soggy.
To make the simple syrup, place 1 cup of sugar and 1 cup of water in a saucepan. Bring the mixture to a boil then continue to cook it until a thermometer reads 200°F. When it reaches 200°F remove it from the heat and stir in a couple of teaspoons of vanilla extract. That’s it! That is why it is called simple syrup. It is so easy.
Decorate the cake:
When it was time to decorate the Barbie doll cake, I pulled the cakes out of the freezer and the disk of buttercream frosting out of the fridge. I set them on the counter for a couple of hours to come to room temperature.
Stack the cakes:
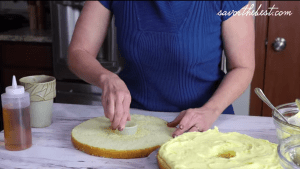
I spread a bit of frosting on a 10-inch cake board then ‘glued’ the 10-inch cake to the board. Next, I sliced the cake through the middle so that I had two 10-inch cakes. I did that with all the cakes but it isn’t necessary. The main reason I torted the cakes was that I wanted more layers so I could have more filling ?
I put the simple syrup in a squeeze bottle and drizzled it all over the first layer. Next, I spread a thin layer of filling on the cake and topped it with the second half of the 10-inch cake.
I repeated those same steps with the 9-inch, 8-inch, and 6-inch cakes.
Oh, I almost forgot! I cut a small circle out of the center of each cake layer so that the Barbie doll could fit in the middle. I found a round cookie cutter that was just a smidgen larger than the circumference of the Barbie doll and cut the center of the cake out.
Save the scraps for later. I will tell you about that in a bit.
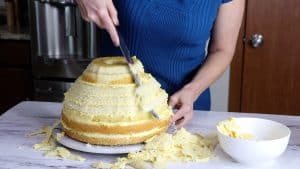
Carve the cake:
After all the cakes are stacked and filled, you need to carve the cake. First, I stuck the whole thing in the freezer for about an hour so it would be easier to carve. The time in the freezer helps the cake get a bit firmer which makes carving the cake much easier.
You don’t need a special Barbie cake pan to make this cake. You can use round cake pans that you already have in your kitchen.
To shape the cake, I got a serrated knife and started cutting! You just have to ‘eyeball’ the shape. I tried to give the cake a smooth, bell shape that was as symmetrical as possible. It wasn’t perfect but pretty good for an amateur.
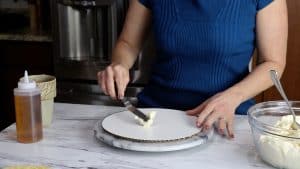
Frost the cake:
Once you have the cake shaped, you need to cover it with buttercream so the fondant will stick.
I used an offset spatula to spread the frosting on the cake. Then to give it a smooth appearance, I cut a flimsy plastic cutting board into a small square and used it to smooth out the buttercream.
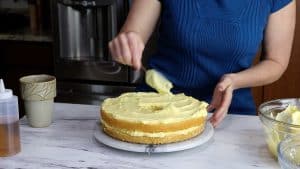
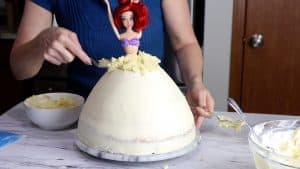
Place the Barbie doll in the center:
At this point, I wrapped the bottom half of the Barbie doll with plastic wrap and placed her in the center of the cake. I pinned her hair up out of the way and raised her hands in the air so they would stay out of the way.
The cake came up to the center of the doll’s hips. I wanted a smooth transition that would go up to her waist. To fill in that space, I mixed a little buttercream with some of the scraps of cake and made a ‘cake-paste”. Next, I spread that ‘cake-paste’ into the gaps and made the cake go up to the Barbie doll’s waist.
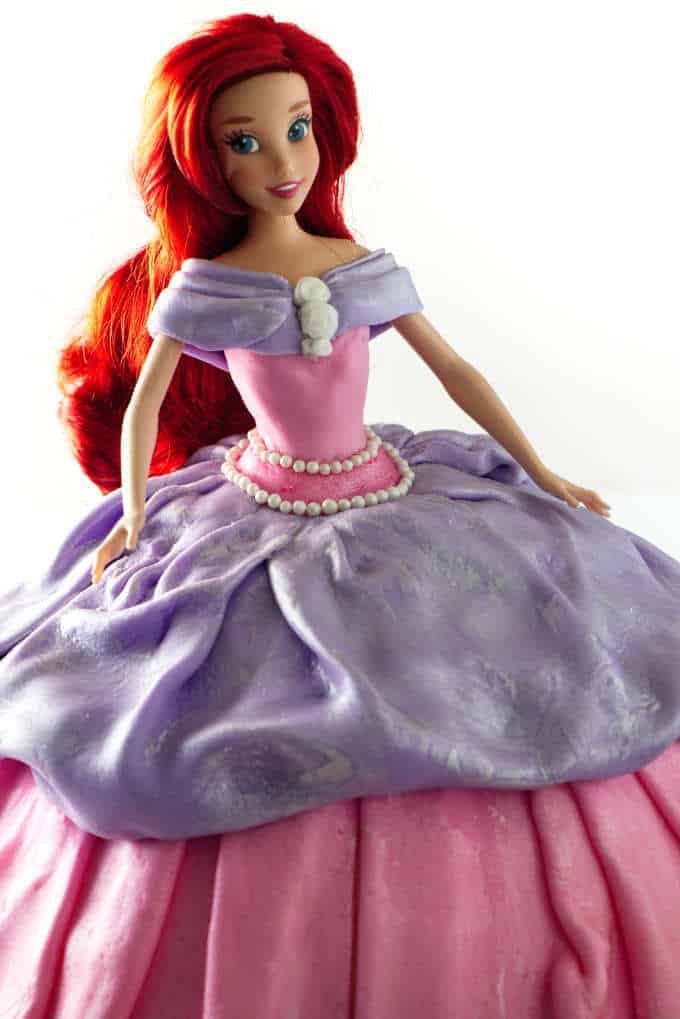
I know I keep calling the doll “Barbie” but I actually used an Ariel doll. Barbie doesn’t come with red hair and I wanted a redhead for this cake, so the Ariel doll was perfect.
Place the cake on the cake drum:
After the cake was covered with frosting, I transferred it to the cake drum. You could use anything you want as long as it is larger than the base of the cake.
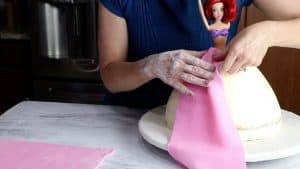
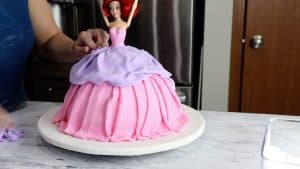
Cover the cake with fondant:
Pink fondant:
Roll the fondant out into a thin sheet then start draping it on the cake. I found it easier to work with small sections of fondant rather than one large piece.
Since the top of the cake is more narrow, the fondant was bulky at the top. To minimize the bulk, I cut the extra fondant away at the top. You can see in the video that it was looking pretty messy at this stage.
I wasn’t worried about the mess because I knew I would cover that up with a second layer. Just cut away and remember that you can cover up any mistakes.
I put a little buttercream on the top half of the Barbie doll so fondant would stick to her. Next, I cut a small section of fondant and draped it on her bodice. I didn’t use a template, I just covered her and then used a knife to shape the bodice.
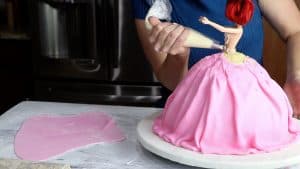
Lavender fondant:
After the pink layer was draped on the cake, I rolled out the lavender fondant. This time, I kind of pre-shaped the lavender skirt before I put it on the cake.
A little dab of water will help the lavender skirt stick to the pink skirt. I used a paintbrush to dab some water on, then I used the blunt end of the paintbrush to push the top of the skirt into the waistline.
After I put the lavender skirt on, I continued to shape it until I was happy with how it laid on the cake.
Finishing details:
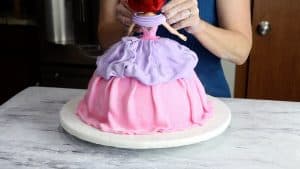
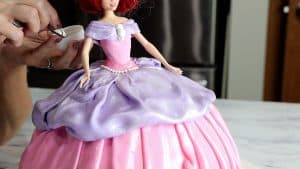
Belt around the waist:
I cut a skinny strip of pink fondant to use as a “belt” around the waist. In order to make the belt have clean edges, I used a ruler to cut the fondant straight. I then painted a dab of water on the waistline so the strip of fondant would stick.
Sash for the top:
Next, I put the Barbie dolls arms down and created a sash to drape around her shoulders. I used the lavender fondant for the sash. Simply cut a small rectangle out of the fondant and fold it back and forth to create pleats.
I draped the pleated sash around the back and wrapped it around to the front. I cut it even with her bust line and pushed it into the doll with the back of my paintbrush.
That left an unfinished, jagged edge that I needed to cover up. I rolled some skinny strips of white fondant into small roses and placed them down the seam.
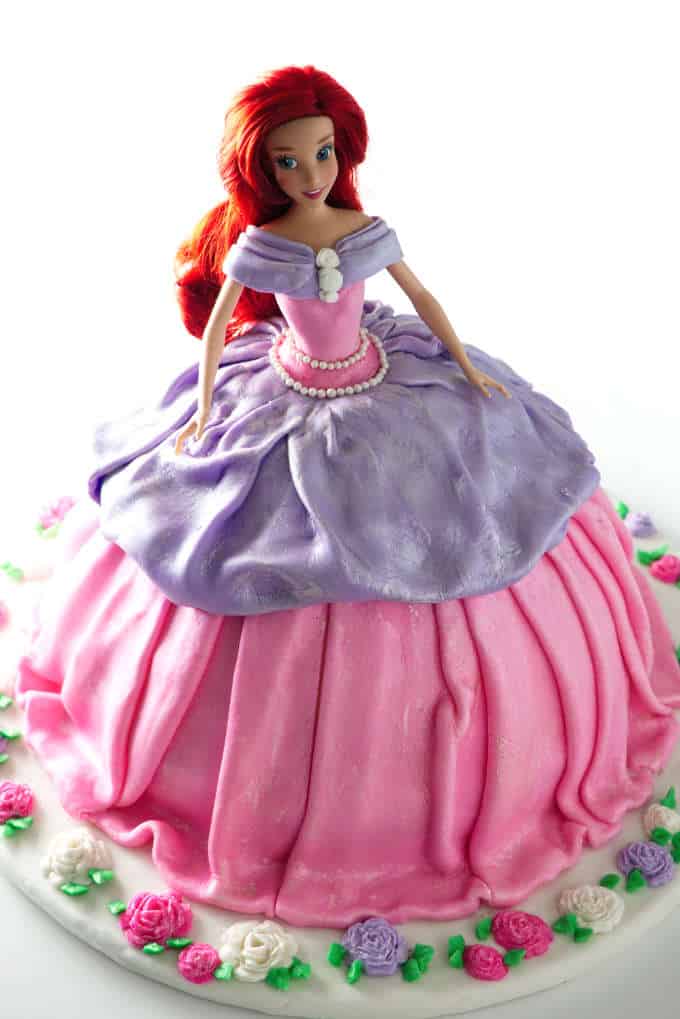
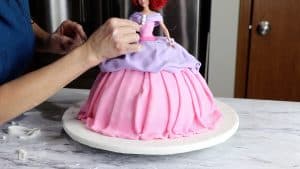
Put a shiny finish on the Barbie cake:
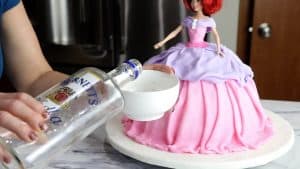
I wanted the cake to have a glistening, shiny finish so I used some silver pearl dust to finish the cake.
To create a paintable liquid with the pearl dust, I mixed it with vodka. You don’t have to worry about having alcohol on the cake because it will evaporate very quickly. If you don’t want to use vodka, you can use a clear lemon or vanilla extract. I personally prefer to use vodka because it is flavorless and cheaper.
Add some pearls:
I stuck some small sugar dragees around the waistline to give it a string of pearls. Since the dragees were so small and my clumsy fingers so large, I used some tweezers to place the “pearls”.
Decorate the cake drum:
The base of the cake is 10 inches around. It sat on a 14-inch cake drum which left space for decorations. I had originally planned to put the pre-made fondant roses on the dress (to hide some of the flaws) but I decided to use them to decorate the edges of the cake drum.
Just glue the fondant roses to the drum with a dab of water. You can make leaves with green fondant but I chose to do it quicker by using buttercream. I used a leaf tip to pipe the buttercream.
If I had remembered, I would have put a pink ribbon around the edge of the cake drum.
This Barbie cake makes a great birthday cake and the perfect centerpiece for a Barbie-themed party. After the guests eat the cake, the birthday girl can keep the Barbie doll.

Barbie Cake
Equipment
- [Off-set spatula]
- Tweezers
- paintbrush
Materials
- 10 inch cake board
- 14 inch cake drum
- 10 inch round cake pan
- 9 inch round cake pan
- 8 inch round cake pan
- 6 inch round cake pan
- 2 batches marshmallow fondant
- Pearl luster dust
- Sugar dragees
- buttercream frosting
- silicone mold for fondant roses
- Barbie doll
Instructions
Bake and stack the cakes:
- Bake 4 round cakes in the following sizes: 10-inch, 9-inch, 8-inch, and 6-inches.
- Cut a hole out of the center of each of the cakes. The hole should be slightly larger than the Barbie doll’s hips.
- Place some buttercream on a 10-inch cake board then set the 10-inch cake on top. If you want to tort the cakes, do that now. (see notes)
- Spread cake filling or buttercream on top of the 10-inch cake then top it with the 9-inch cake. Repeat the process with the 8-inch cake and the 6-inch cake. Place the stacked cakes into the freezer for about an hour. This will firm the cake up a bit and make it easier to carve. When you take the cake out of the freezer, place it on a larger cake drum that you will use to serve the cake.
Shape the cake:
- Use a serrated knife to slice down the outside edges of the cake, smoothing the edges into a bell shape. Save the cake scraps in a bowl and mix them with a little buttercream until it looks like a thick paste. You will use this in the next step.
- Cover the Barbie dolls legs with plastic wrap and place her in the center of the cake. Spread the cake with buttercream, getting it as smooth as possible. Use the mixture of cake scraps to fill in the space at the top of the cake and the dolls waistline.
Cover the cake with fondant:
- Have at least 3 colors of fondant ready. Roll out some fondant into a thin sheet and drape it over the cake. Work with small sections of fondant to make it easier to work with. Fold the fondant to make it look like pleated fabric. Drape a second layer of fondant over the first to give the skirt a more dimensional look. Use a paintbrush dipped in water to dab the fondant with water. A small amount of water will help the fondant stick to itself but don't use too much water or the fondant will melt.
- Spread a small amount of buttercream on the bodice of the Barbie doll then drape some fondant on her to create a top.
- Cut a contrasting color of fondant and wrap it around the first layer of the skirt. Make it shorter than the first skirt and tuck the ends under to give it a plump "folded fabric" look.
- Cut a contrasting color of fondant into a rectangle and fold it into pleats. Drape the pleated fondant across the shoulders of the Barbie doll. Dab some water on the ends so it will stick to the Barbie’s top. Use the blunt end of the paintbrush to push the fondant into her bust line.
- Cut a narrow strip of fondant and roll it up, making 3 small "roses". Place the roses along the seam of the sash. (Alternatively, you could put some sugar pearls on the seam)
- Cut another narrow strip of fondant to wrap around the waist line of the doll. Place some sugar pearls along the seams of the waistline.
Finishing steps:
- Mix ½ teaspoon of Pearl luster dust with ½ teaspoon of vodka or clear lemon extract. Use a paintbrush to brush the luster dust onto the dress.
- Press any leftover fondant into a silicone flower mold and make fast fondant flowers to decorate the cake board and/or the dress.
Video
Notes
- If you want to tort the cake and fill it with a vanilla cream cake filling, see the post narrative to read how I did that. Otherwise, it is easier and faster to make the cake if you do not tort (or slice the cake horizontally into layers) first.
- You can watch the video to see how I torted the cakes.