
This post may contain affiliate links. Please read our disclosure policy. As an Amazon Associate, I earn from qualifying purchases.
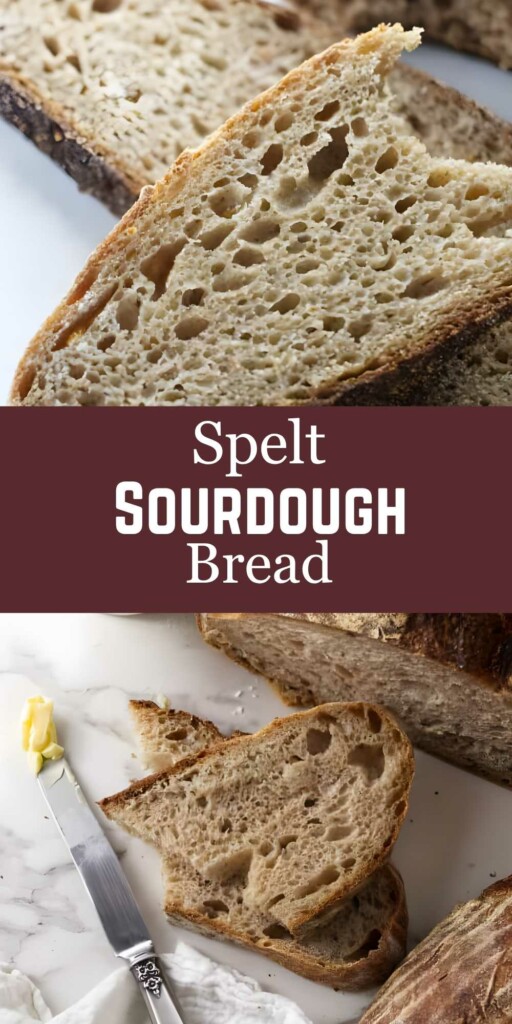
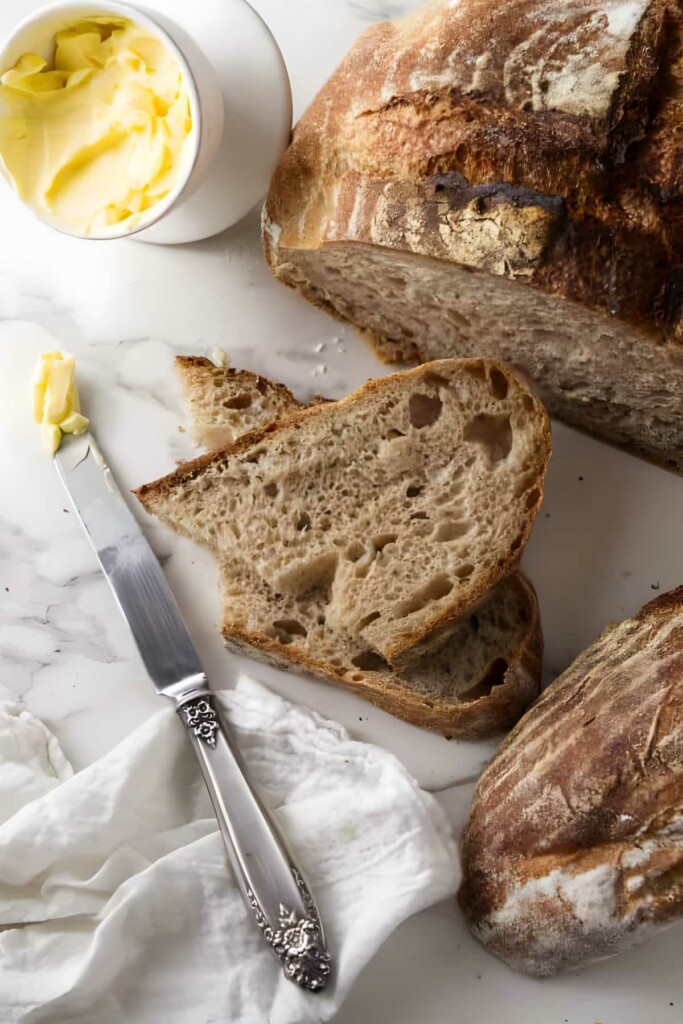
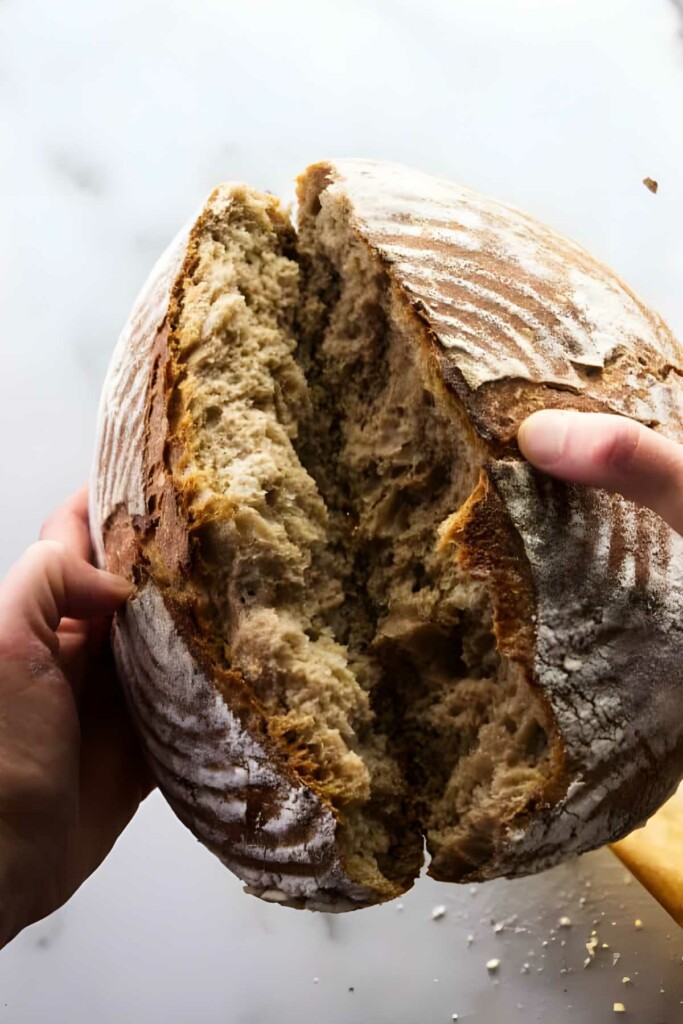
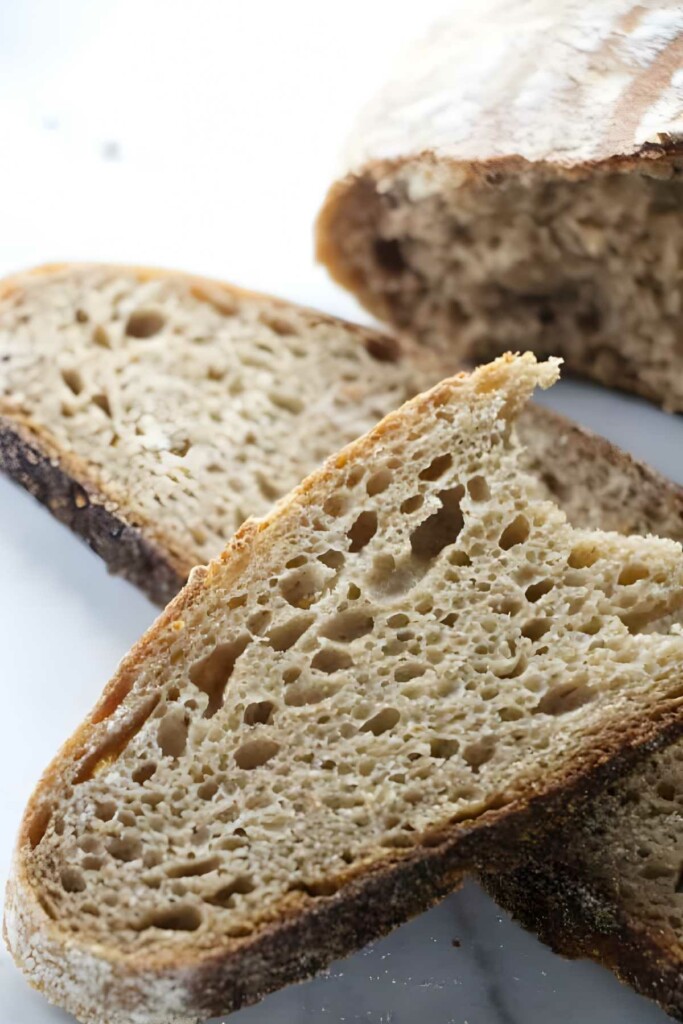
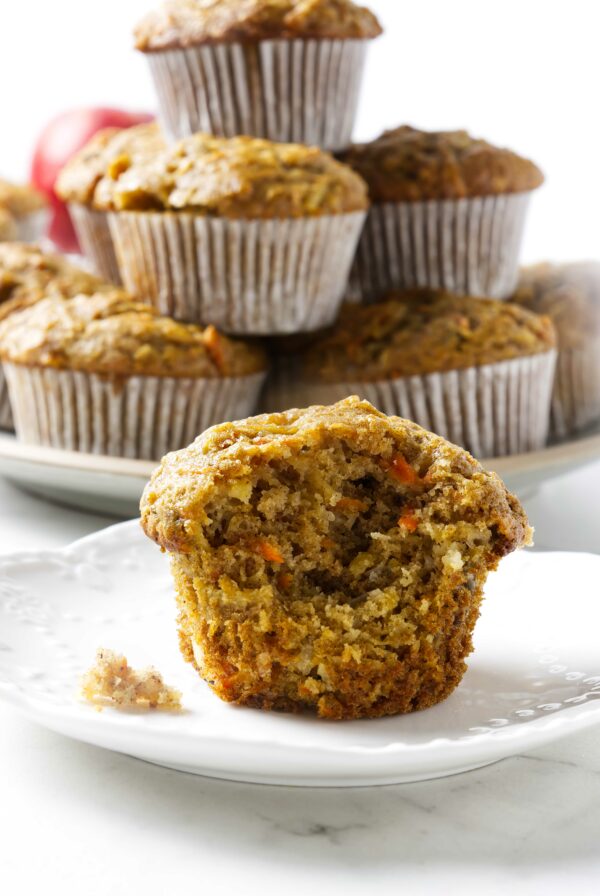
This 100% whole wheat spelt sourdough bread is the real deal. No white flour and no commercial yeast. Just four ingredients and that naturally tangy, chewy, artisan-style crumb. The whole grain spelt gives it a nutty flavor and rustic texture. If you’re after a hearty loaf with depth and character, this one earns a spot on repeat.
If you’re after something more classic, you can try my sourdough bread made with white flour.
Here is Why This Sourdough Spelt Bread Recipe Works
Uses a natural sourdough starter: No commercial yeast here. Just good old fermentation doing its thing for depth and complexity. If you need one, here’s how to make a sourdough starter with pineapple juice.
Spelt flour keeps things interesting: It’s nuttier, softer, and brings a rustic flavor that makes it a favorite for whole grain baking. Want more ways to use it? Try my spelt banana bread for a naturally sweet treat or this hearty spelt Irish soda bread.
Flexible proofing options: Whether you want it same day or tomorrow, this dough plays nice with room temp or cold fermentation.
No fancy equipment needed: Sure, a Dutch oven helps, but you can pull this off with a baking sheet if you need to.
Want to try something more relaxed with your starter? My sourdough focaccia is low-effort, no-knead, and perfect for sandwiches
Recipe Tips
Weigh your ingredients: Measuring by cups is fine in theory, but spelt is temperamental. A scale keeps things precise and saves you from guesswork.
Don’t add extra flour: Spelt gets dense fast if you add too much flour. Embrace the stickiness and keep your hands wet instead.
Don’t wait for a full double rise: Spelt doesn’t have the gluten muscle for dramatic lifts. Aim for 1½ to just under 2 times the original size. Any more, and it can collapse.
Flour your proofing basket: Use a mix of rice and all-purpose flour to keep the dough from welding itself to your towel or basket.
Be patient with the sticky stage: Yes, it’s messy. No, it doesn’t mean you did something wrong. That wet dough is exactly what gives you an open crumb and soft interior.
Working with ancient grains? Einkorn, like spelt, has a weaker gluten structure and benefits from gentle handling. If you’re curious, check out my einkorn sourdough bread recipe.
Storing Leftovers
Refrigerate: Store leftover slices in an airtight container at room temp for up to 2 days, or refrigerate for up to 5 days if your kitchen runs warm.
Freeze: Wrap slices or the whole loaf tightly in plastic, then foil, and freeze for up to 2 months. Thaw at room temp before reheating.
Reheat: Toast slices straight from the fridge or freezer. If you’re reviving a whole loaf, warm it in a 350°F oven for about 10–15 minutes.
100% Whole Wheat Spelt Sourdough Bread
This 100% whole wheat spelt sourdough is simple, hearty, and full of character. It lets the spelt do what it does best; add a nutty flavor, a tender crumb, and a rustic feel that makes each slice feel homemade in the best way. Once you’ve made it a time or two, it settles into that reliable, keep-it-in-the-rotation kind of recipe.
Pin this now to find it later!
Pin It
100% Spelt Sourdough Bread
If you make this recipe, please leave a star rating and comment.
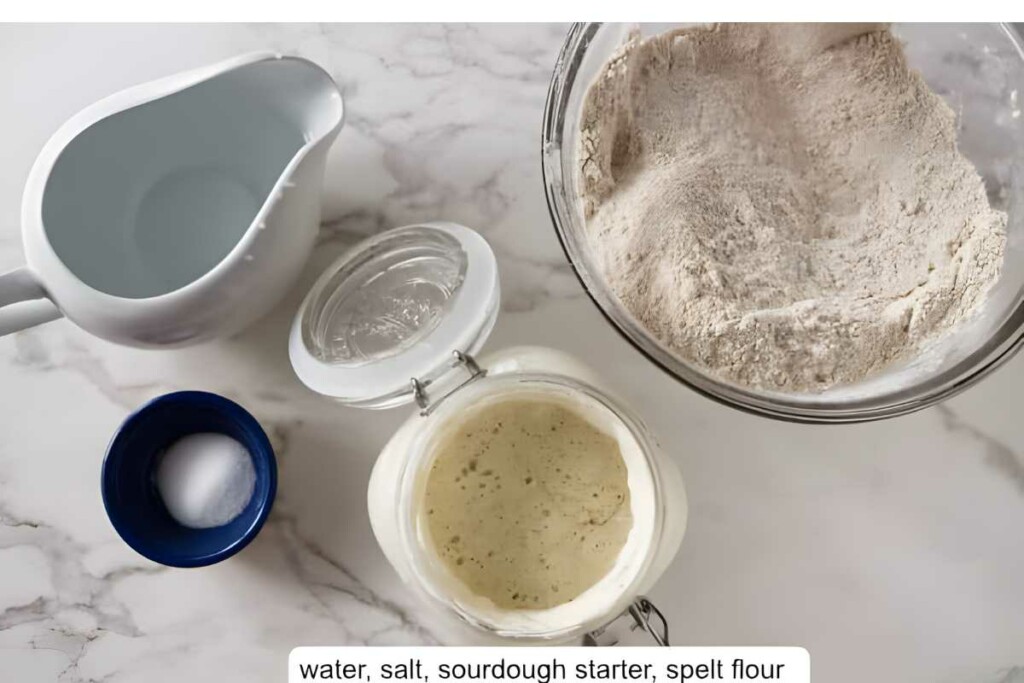
Ingredients
- 1 cup active sourdough starter, (240 grams)
- 1 ¾ cups warm water, (413 grams)
- 4 ¼ to 5 ¼ cups whole wheat spelt flour, (550 to 680 grams)
- 2 teaspoons salt, (12 grams)
Instructions
- Combine all the ingredients in the bowl and stir until it is well combined. The dough will have a rough, chunky look.
- Dump the dough onto a work surface and knead the dough with your hands until it is smooth. Approximately 10 to 12 minutes. (Essentially, you are massaging the dough by stretching and pushing. This will help develop the gluten.) At this stage, it will be wet and sticky. Try not to add more flour or your finished bread will be dense and heavy. The dough will stick to your hands and feel messy but if you get your hands wet it won't stick as easily.
- Place the dough into an oiled bowl and turn it so oil coats the top of the dough. Cover with plastic wrap and let it sit at room temperature for 3 to 6 hours (see notes) or in the refrigerator overnight. (A longer proof time in the fridge will give the bread a more complex, sourdough flavor.)
- Turn the dough out onto a work surface and form it into a round ball. (See notes)
- Place the ball of dough into a proofing basket or any container that is the shape that you want your bread to be shaped. (See notes)
- Let the dough rise again a second time for 3 to 6 hours** at room temperature until almost doubled in size. (Or you could let it rise in the fridge overnight for 12 to 15 hours)
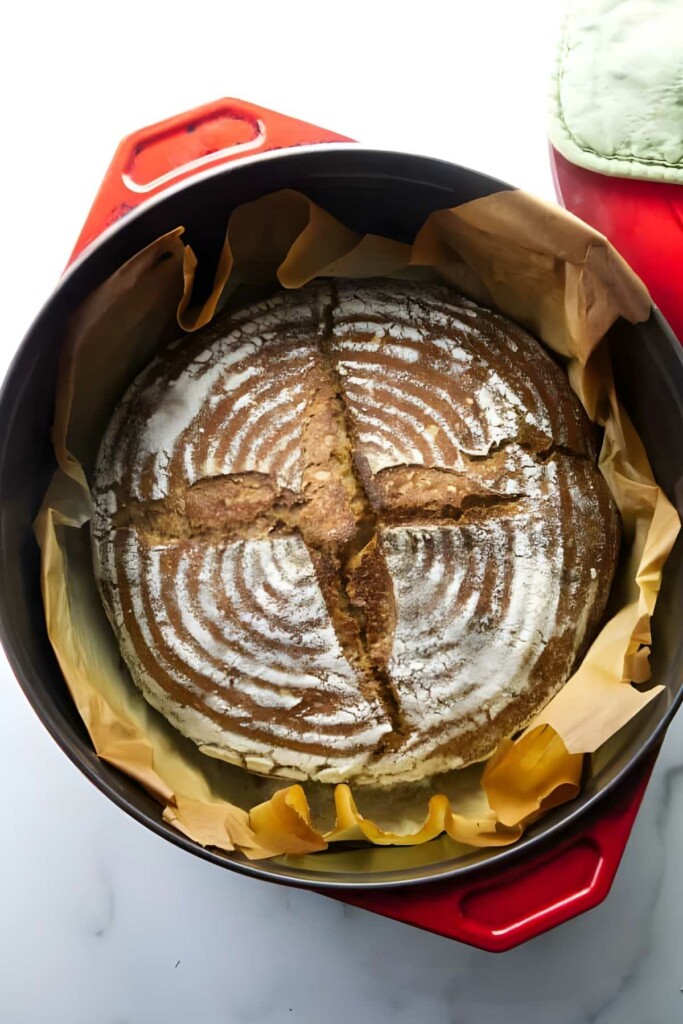
- Preheat the oven to 450°F. Place the Dutch oven inside so it gets hot. It should take 20 to 30 minutes to preheat the Dutch oven.
- Place a piece of parchment on a board then lay it on top of the proofing basket. Flip the board and basket so the basket is on top then remove the basket.
- When the oven is hot, use the parchment paper to place the bread into the Dutch oven. Make a slash in the loaf with a sharp knife. For an extra burst of steam and a slightly higher rise, spray the dough with a bit of water.
- Bake for 20 minutes then remove the lid and finish baking for another to 30 to 35 minutes.
- Let the bread cool completely before slicing it.
Video
Notes
Nutrition
Nutrition information is automatically calculated, so should only be used as an approximation.
 Like this recipe? Rate & comment below!


I tried the recipe and it was quite good! but I have a question. mine was really dark color. how is your so light? doesn’t look like 100% whole wheat :p
Great question, you’re not imagining it.
Whole wheat spelt can vary quite a bit from one brand to another. Some are milled finer and look lighter, while others are a bit coarser and give a darker color. So if yours came out darker, it’s most likely just the brand of flour you used and how they milled it, not anything you did wrong.
How do i know how much flour to use?
The flour amount is listed right in the recipe card. It’s 4¼ to 5¼ cups (550–680 g) whole wheat spelt flour. The range accounts for the natural variability in spelt flour and hydration. Start with the lower end and add more only if the dough feels too wet to handle.
GRAMS TO CUPS
I have both grams and cups listed in the recipe. You will see the cup measurement in the front of the ingredient and the grams measurement at the end of the ingredient. Hope that helps.
I have been making this bread for years now and its my favorite! I use sprouted spelt. The best recipe ever, thank you
Thank you so much! I’m thrilled to hear this recipe has been a favorite for you over the years. Using sprouted spelt sounds amazing. I really appreciate you taking the time to share your experience!
Hi Dahn,
I have just put this together but I realised half way that I only had 85g of starter!
How would you suggest I compensate for that timing wise?
Thanks 🙏
Using only 85 grams of starter (instead of 240g) will slow things down quite a bit, since you’ve got less yeast and bacteria to get things moving. But it’s totally doable—you’ll just need to extend your fermentation times.
The first proof may take 8 to 10 hours at room temperature. Watch the dough, not the clock. Same with the second proof—give it time to rise, but keep an eye on it.
One thing to watch for: a longer fermentation can make the dough more acidic, which might cause it to slacken. If it looks very airy or soft, consider shortening the second proof slightly so it doesn’t over-expand.
Also, is it absolutely necessary to preheat the baking ware, or is it possible to let the dough rise the second time directly in the bread pans and put that straight into the oven?
Yes! You can let the dough rise directly in the bread pans and bake without preheating them. Preheating helps with oven spring, but it’s not essential. To compensate, let the dough rise fully before baking and add steam by placing a pan of hot water in the oven. Bake at 425°F for 35–40 minutes until golden
Great recipe, thanks! I’m using 2 small bread pans because I don’t have a Dutch oven. How long should I bake the loaves since I don’t have a lid to take off as stated in the recipe?
Since you’re using two small bread pans instead of a Dutch oven, you can bake the loaves at 425°F for about 35 to 40 minutes.
Start checking for doneness around 32 minutes, the loaves should be golden brown, and the internal temperature should be around 200–205°F
Hello I can’t get the dough shaped in a ball for the second rise.. Would you know what I’m doing wrong? My starter was active, bubbly and happy and I used 550g of whole spelt floor. Could it be over hydrated? It was kind of sticky even when I tried to shape.. Thanks!
If the dough is still really sticky and hard to handle, you can gently knead in a bit more flour—just a tablespoon or two at a time—until it becomes easier to shape. That said, try not to overdo it, since adding too much flour can make the final bread dense.
Thank you so much for the quick reply! I’ll try to knead in more flour next time. I’ll see what comes out of it this time. I might just end up making croutons or breadcrumbs if it doesn’t work out
You can also just add it to a bread pan to hold the shape.