
This post may contain affiliate links. Please read our disclosure policy. As an Amazon Associate, I earn from qualifying purchases.
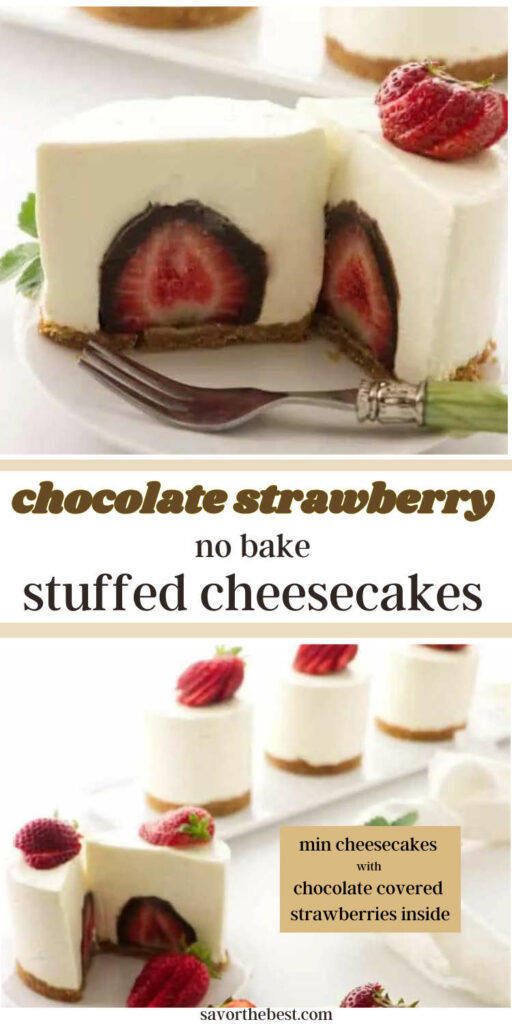
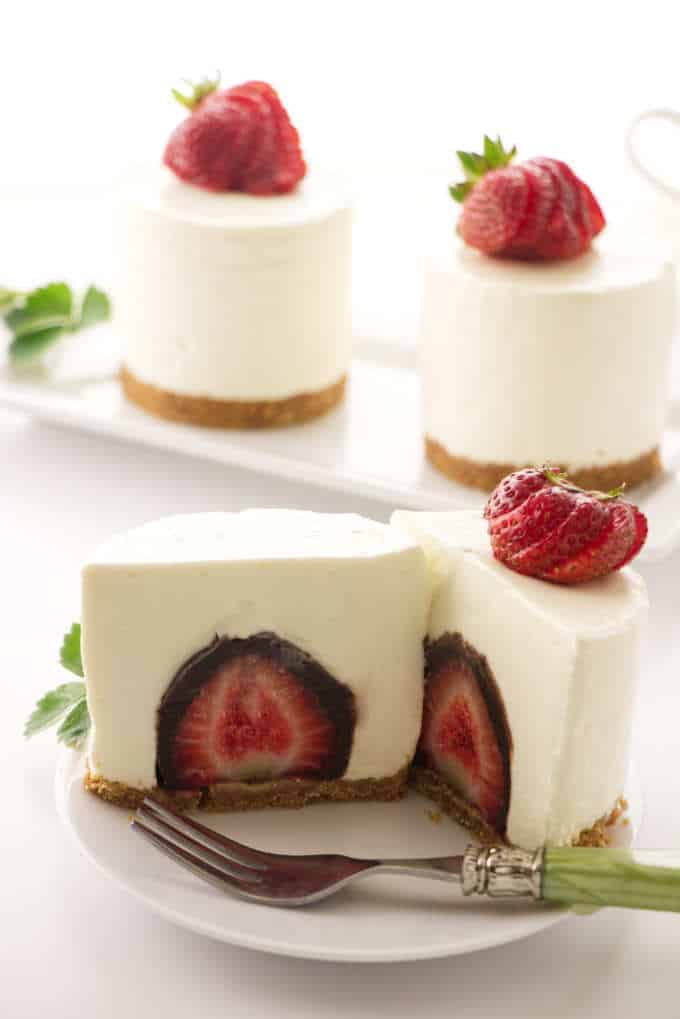
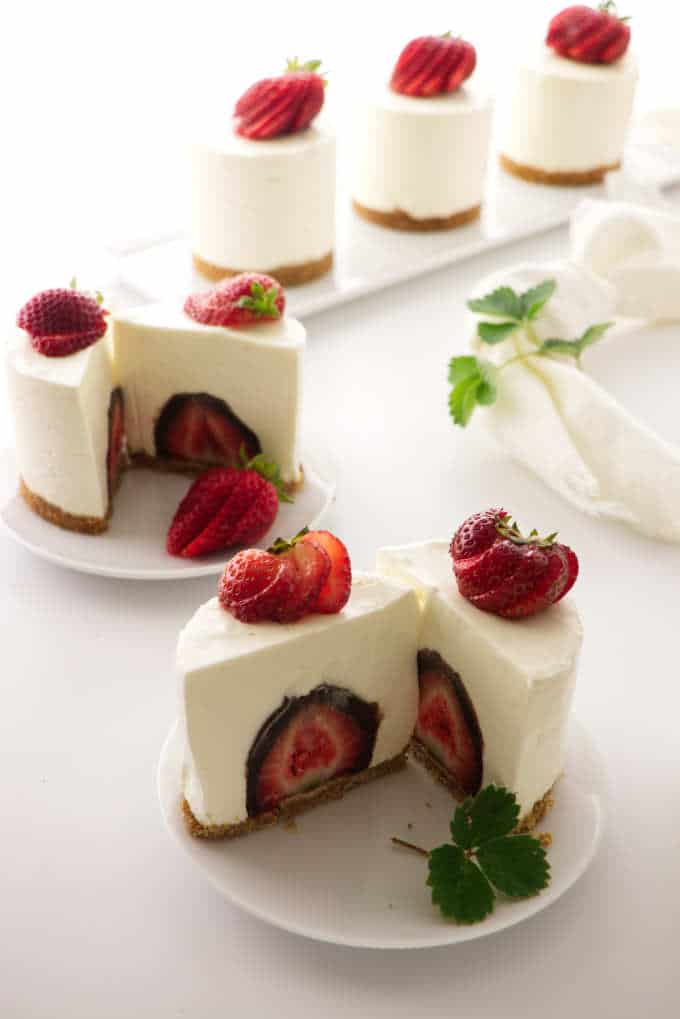
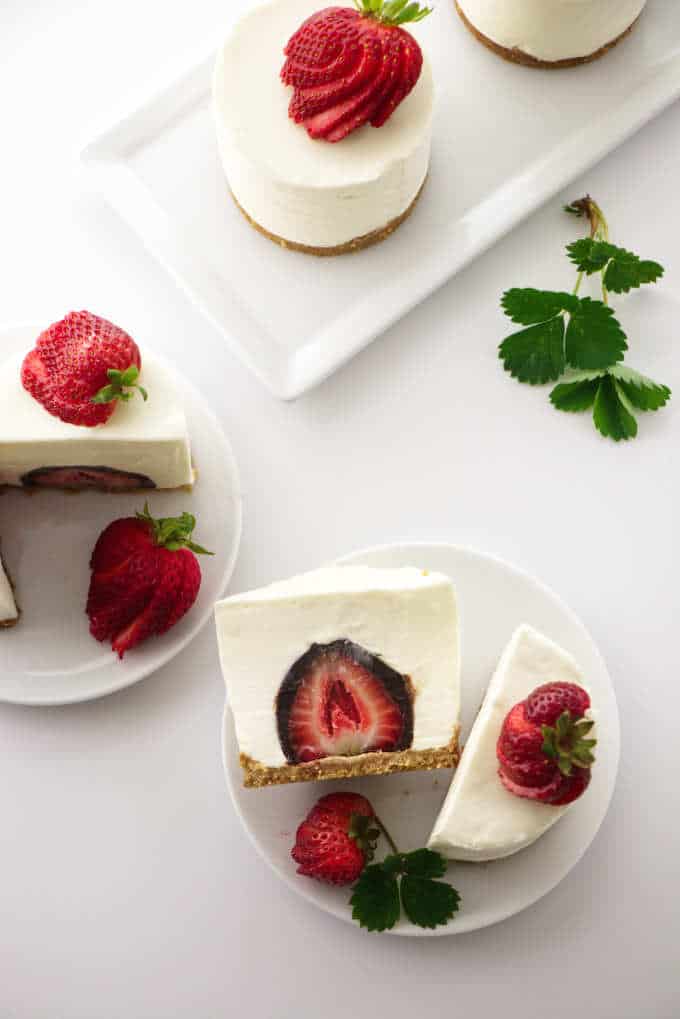
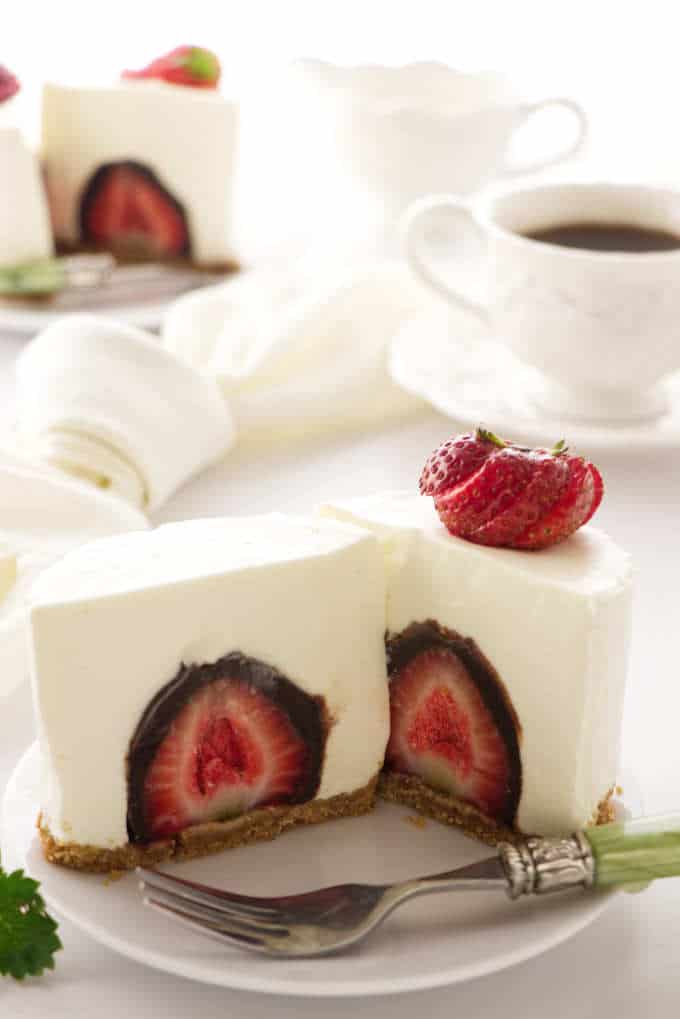
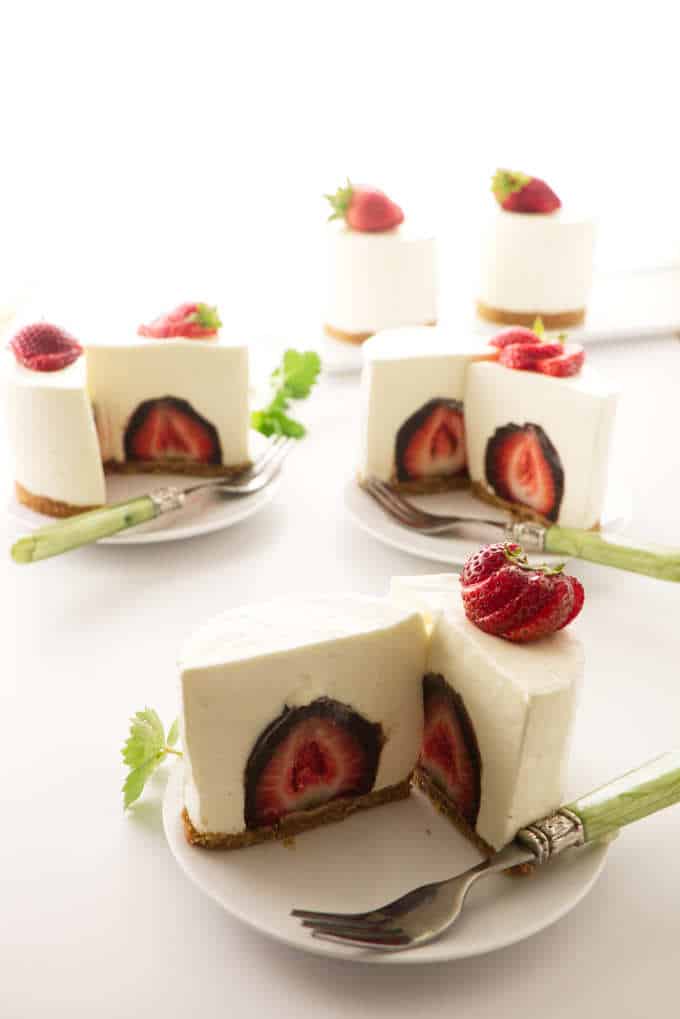
These individual no-bake cheesecakes are beyond awesome! The sweet vanilla cheesecake is smooth, creamy and delicious as it sits on a buttery graham cracker crust. But wait….there is a surprise in the center of the cheesecake!
A fresh, chocolate covered strawberry! Keep this little surprise a secret when serving and watch as your guests dive into their own personal cheesecake. They will be delighted and scarf up every crumb.
Everyone gets their own little cheesecake with this dessert. Since it is a no-bake cheesecake, it is the perfect dessert for summer when you don’t want to heat up the oven.
Even the crust does not go into the oven. The graham cracker crumbs are coated with butter and formed into sweet crusts that hold together as the butter hardens in the fridge.
No-bake cheesecake with gelatin
This is a no-bake cheesecake with gelatin and whipping cream added to the cream cheese. The gelatin gives the cheesecake structure and stability while the whipping cream and cream cheese keep it creamy, rich and smooth.
It is incredibly easy to make and the perfect consistency for hiding a chocolate-covered strawberry in the center.
How to make no-bake cheesecakes with chocolate-covered strawberries inside:
There are a few things you should know about this recipe before you get started.
Special supplies:
Mini Cheesecake pans:
First, you will want 3-inch cheesecake pans. If you use cupcake pans, the cheesecakes will be too small for the strawberries. Another common size pan for small cheesecakes are the 4-inch springform pans.
The 4-inch pans might work but when I placed the strawberries in the center, there was too much space between the strawberry and the edge of the pan. I wanted the strawberries to really stand out when the cheesecake was sliced open. The 3-inch pans are perfect, albeit a bit more difficult to get. I will provide a link if you can’t find it in your local kitchen store.
Acetate cake collars:
The mini cheesecake pans are a bit too shallow for a tall strawberry. You want to completely hide the chocolate covered strawberry in the center of the cheesecake. In order to cover the strawberry completely, you will want to extend the height of the cheesecake pans.
Acetate cake collars are the easiest way to make the mini cheesecakes taller. I used cake collars that are 3 inches tall. If you don’t want to buy acetate cake collars you can cut parchment paper into 3-inch strips and use them instead. Watch the video to see how I lined the acetate sheets around the mini cheesecake pans.
Update: Some readers have reported poor results with the parchment paper and found that it did not release from the cheesecake very well. For consistent results, I recommend using acetate collars.
About the no-bake graham cracker crust:
I made this recipe so that the entire dessert can be “no-bake”, including the graham cracker crust. It only takes 3 ingredients. Graham crackers, sugar, and butter. Combine the graham cracker crumbs, sugar and melted butter together then pack the mixture into the bottom of the pans.
You will need to press it down pretty firmly. I used the bottom of a small glass to press it down. You could also tamp it down with a cork or a small bottle. Just make sure you press it really firmly.
If the crumbs are not packed down firmly then the crust will crumble and fall apart when you slice the cheesecake.
Once it is packed down, stick it in the fridge. The melted butter will firm up and make the crust hard and crunchy.
It makes a pretty firm crust but it won’t get as crisp as one that you bake. If you want a super crisp crust then you can go ahead and bake it at 350°F for 10 minutes.
The chocolate-covered strawberries:
I made these little cheesecakes several times to get the recipe right. On the first try, I made the chocolate covered strawberries with plain melted chocolate. I placed them in the middle of the mini cheesecakes and let them firm up for a few hours.
The problem with making the chocolate covered strawberries with only melted chocolate is that the chocolate gets pretty firm. It was difficult to slice through the chocolate covered strawberries and I just wasn’t satisfied.
The best and yummiest solution was to cover the strawberries in a thick chocolate ganache. All you need to make chocolate ganache is chocolate and cream. With the right proportions of cream to chocolate, the ganache will put a thick coating around the strawberries and then firm up in the fridge.
The smooth, rich ganache is firm enough to hold its shape after it gets cold but it is still soft enough to slice through with a fork. The smooth, rich, chocolatey texture of chocolate ganache is the perfect solution for hiding chocolate-covered strawberries inside a creamy cheesecake.
The filling for the no-bake cheesecake with gelatin:
About the gelatin:
These individual no-bake cheesecakes need the support of gelatin. It is really easy to work with gelatin but I want to give you some tips.
A really important step when you work with gelatin is to let it bloom. Blooming gelatin is simply the process of softening the gelatin in liquid.
When the gelatin granules sit in water, they absorb the water and get larger, or bloom. After the gelatin absorbs water and gets soft, it will dissolve easily when you heat it up.
It only takes about 20 seconds in the microwave to dissolve the gelatin and turn it into liquid.
If you heat it up and get it nice and thin then let it sit for too long it will solidify into a firm, clear jello. It is ok if that happens. If it sits too long and gets firm before you put it in the cheesecake mixture then just give it another blitz in the microwave.
About the cream cheese:
You need to let the cream cheese sit out at room temperature and get soft. If you use cold cream cheese, it will not beat smoothly. It will have lumps and ruin the texture of your mini cheesecakes. If you forget to set the cream cheese out to soften, you can soften it within 30 minutes if you place the cream cheese in a plastic bag and let it sit in some lukewarm water.
You could also use the defrost button on your microwave but be very careful. Even on a low defrost setting, cream cheese will melt pretty easily.
About the whipping cream:
When it is time to add the whipping cream to the cream cheese mixture, it is best to stir the cream in by hand. If you use an electric mixer, the cream will thicken the cheesecake and make it more difficult to pour into the mini cheesecake molds.
It will still work but you will have a bigger chance of getting large air pockets in the center of the cheesecakes when you spoon it over the strawberries.
Pipe the mixture into the pans:
I placed the no-bake cheesecake mixture in a piping bag and piped it around, and on top of the chocolate-covered strawberries. The piping bag made it easy to get the mixture into the pans without adding in a lot of air bubbles.
You could spoon it into the mini pans but you will end up with more air bubbles that way. Just make sure you tap the pan a few times to break up the air bubbles.
These sweet little surprise cheesecakes are so delicious and it is a fun project that you can do up to two days in advance. You’re welcome!
More Chilled or Frozen Desserts
- Lavender Panna Cotta
- Strawberry Pie with Jello
- Cheesecake stuffed strawberries
- Sugar Free Mango Ice Cream
- 31 Cool Summer Dessert Ideas
Can you freeze this no-bake cheesecake?
We recommend eating these individual no-bake cheesecakes within 2 days of making them. The cheesecake, graham cracker crust, and chocolate ganache will all freeze and thaw just fine. However, the strawberry will make a watery mess when it thaws.
More Recipes to Try
This recipe was inspired by a photo my sister saw on Instagram. She couldn’t find a recipe so she asked my mother and I If we could try to “reverse engineer” the dessert.
Pin this now to find it later!
Pin It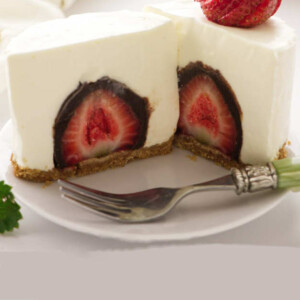
No Bake Cheesecake with a Surprise Inside
If you make this recipe, please leave a star rating and comment.
Equipment
Ingredients
Graham cracker crust
- 1 cups graham cracker crumbs, from 8-9 graham crackers
- 2 tablespoons granulated sugar
- 4 tablespoons butter, melted
Chocolate covered strawberries
- ½ cup heavy cream
- 8 ounces dark chocolate, finely chopped
- 6 fresh strawberries
Cheesecake filling
- ¼ cup water, cold
- 1 tablespoon unflavored gelatin powder
- 24 ounces cream cheese, block style, softened
- 1 ½ cups powdered sugar
- 2 teaspoons vanilla extract
- ½ teaspoon salt
- 2 ¼ cups heavy cream
Equipment:
Instructions
Graham Cracker Crust
- Place the graham crackers, sugar, and butter in a bowl and stir it until it looks like wet sand and it holds together when you pinch it. Press the mixture into the bottom of six 3-inch pans. Place them in the refrigerator to chill while you make the filling.
Chocolate covered strawberries:
- Line a plate with parchment paper and set aside.
- Heat the heavy cream in the microwave or in a saucepan over medium heat on the stove. Only heat it until it gently simmers and don’t let it boil.
- Pour the hot cream into the chopped chocolate and let it sit for a few minutes until the chocolate melts. Once the chocolate melts, stir it until it is smooth.
- Slice the green leaves off of the strawberries and dip them into the chocolate ganache.
- Place the chocolate-covered strawberries on the parchment-lined plate and set them in the fridge to get firm.
Cheesecake filling
- Put the cold water in a microwavable bowl and sprinkle the gelatin over the water. Set the gelatin aside to soften (or bloom) for at least 5 minutes while you beat the cream cheese.
- Place the cream cheese in a large mixing bowl and beat with an electric mixer until it is smooth and there are no lumps.
- Add the sugar, vanilla, and salt and beat until smooth and creamy. Make sure you scrape down the sides and bottom of the bowl to incorporate all the ingredients well.
- Stir in the heavy cream by hand. Don’t use the electric beater for this step or the mixture will get too thick to easily pour into the cheesecake pans.
- Place the softened gelatin in the microwave for 20 to 30 seconds, stirring at 10-second intervals. Heat it until it is completely dissolved and liquid. Keep an eye on it and stop the microwave if it starts to boil. Let it sit for a few minutes until it is comfortably warm.
- Drizzle the warm gelatin into the cream cheese mixture and stir it until it is well incorporated.
Make the mini cheesecakes:
- Place the chocolate-covered strawberries in the center of each of the mini pans.
- Line the inside of the mini pans with a strip of acetate sheets.
- Spoon or pipe the filling over the chocolate covered strawberries inside the mini cheesecake pans and smooth the tops. Cover them with plastic wrap and refrigerate for at least 4 hours or preferably overnight.
- When ready to serve, push up on the bottoms of the cheesecake pans and remove the individual cheesecakes. Transfer them to a serving plate and remove the acetate sheets. garnish with strawberries or mint leaves.
- To get a clean, pretty slice, dip a sharp knife in hot water then slowly slide it through the center of the cheesecakes.
Video
Notes
- You will need about 8 to 9 graham crackers to make 1 cup of crumbs. To make the crumbs either pulse the crackers in a food processor or place them in a sealable plastic bag and pound them with a rolling pin.
- When you sprinkle the gelatin over the water, disperse it evenly over the water. If you dump it in a pile then the center of the pile will not soften. For a smooth cheesecake texture, it is important to let the gelatin soften in the water before you heat it up and dissolve it.
- Make sure you let the cream cheese come to room temperature before making this recipe. Cold hard cream cheese will not beat into a smooth creamy consistency as easily. You don’t want lumps of cream cheese in your cheesecake.
- Want to soften your cream cheese quickly? Place it in a bowl of lukewarm water (while the wrapper is still on) for 30 minutes. Make sure the water is not too hot though or it will melt.
- The gelatin helps firm up the cheesecake and hold the strawberry in the center.
- The graham cracker crust will get firm in the fridge but since it is a no-bake crust, it will be a bit crumblier than a baked graham cracker crust. If you want to make the crust crispy and more firmly set, bake it for 12 minutes at 350°F then let it cool before making the cheesecakes.
- The acetate collar will give the cheesecake additional height so the strawberries will be completely covered. You could also cut 3-inch wide strips of parchment paper to use as liners if you do not have any acetate sheets. However, some readers reported that the parchment did not work well for them.
- Dip a sharp knife in hot water before slicing the cheesecake. The hot knife will slide through the cheesecake easier and make a clean, smooth cut.
Nutrition
Nutrition information is automatically calculated, so should only be used as an approximation.
 Like this recipe? Rate & comment below!


I need to make 2 dozen of these for Valentine’s day. I can’t afford 2 pans .Can I start making them on the 11th.? I seen the recipe said 2 days they should be eaten. You have any suggestions?
I have let them sit for 3 to 4 days and they still tasted fine. The biggest issue is that the juices from the strawberries start to seep out. The crust also picks up some moisture. If you can Pinch the stems off the strawberries without cutting into them then they will last longer without getting juicy. The strawberries will wobble a bit since the base will be more rounded but it will help them last long enough for you to make 2 batches.
Could I use my own cheesecake recipe and bake these?
This recipe won’t turn out if you bake it. The chocolate on the strawberry will melt in the oven.
Can I make this a banana flavor and if so, where would you add in the bananas and how much?
I haven’t tested this recipe with fruit in the cheesecake batter but it would work to put a slice of chocolate-covered banana in the center of it instead of the strawberry.
Loved the recipe, great taste, but mine also didn’t stand up nice and straight. The strawberries remained covered, but not with nice straight sides. Also you can use medium to small strawberries. I used larger ones and I had to have y’all parchment paper sleeves. Am going to have to find the silicon sheets because the cheesecake really stuck to the parchment. So I guess that’s my question. Do the silicon sleeves just easily come away from cheesecake? I have mine in the fridge overnight.
Yes the silicone sleeves are much more durable and it peels away from the cheesecake very easily. I prefer the sleeves to the parchment. My parchment paper worked but some brands might be more ‘flimsy’. Perhaps making a double layer for extra durability would work. If it sticks to the parchment then run a thin knife around the edge
I did buy two of the pans because I was making 24 little cheesecakes for Valentines Day for the family, and delivered them on the day before. Each recipient was pleasantly surprised and loved them. However, I used the parchment paper and they stuck badly so I spent time smoothing them all out with a very thin knife I had run under hot water. Also, with the last batch , I mixed the Knox gelatin into the cream cheese mixture because when I added it last, it made little lumps. By mixing it with the stand mixer into the cheese mixture, they came out nice and smooth. I found they don’t keep more than two -three days before they get sticky. I love them very much.
Judie Manzer
Thank you for the comment Judie, you are not the only reader that has had trouble with the parchment paper. That is helpful information and I will add an updated note.
These are lovely. But, it’s *you’re* welcome.
Thanks for catching that 😉
Can this be made as a full size cheesecake? If so what size pan would you recommend?
This would firm up perfectly fine in a full size cheesecake pan. I am not quite sure what size pan it would fit into. Without the strawberries, it should fit in a 9-inch springform pan. However, with the chocolate-covered strawberries you will probably need at least a 10-inch springform pan since the strawberries will take up some of the volume.
Could you adapt recipe for a 3 or 5 inch cheesecake pan?
Yes this would work in a larger cheesecake pan but I don’t know how much batter you would need in different sized pans. It would depend on how many strawberries you have in the pans because they would take up some of the volume.
I saw this on facebook and made it for a church pitch-in. Usually I make little changes in on-line recipes, but followed this one to the letter. Results were magnificent. Heard more than one comment about “the best cheesecake” they’d ever tasted. Thank you for sharing.
That is so great to hear, thank you for the comment.
If it didnt settle is there a way to fix or is my whole project ruined??
You can still salvage the project but it would be a bit messy. Before you try to fix it, did you let it sit in the fridge long enough? If it has only been a couple of hours then try to give it a couple more hours or even overnight. If that doesn’t make them set up then you can pull the chocolate covered strawberries out of the center (as long as they were in the fridge the chocolate will be firm enough to do that). Next, spoon all the cheesecake mixture back into a mixing bowl and add 1 tablespoon of dissolved gelatin to the mix. Replace the strawberries then add the cheesecake mixture. Make sure you soften and dissolve the gelatin just the same as the initial recipe or it won’t work. This will be pretty messy and I wouldn’t worry about getting the cheesecake pans scraped completely clean when you spoon out the mixture. If some still clings to the bottom and sides, it should be fine.
I made these cheesecakes today & they
came out great. I followed the recipe & tips
exactly. Very labor intensive but worth the
effort. The cheesecake batter is very tasty
on its own but a bite with cheesecake, strawberry and chocolate is just plain fantastic. I wish there were
mini push pans that were 3” tall so I wouldn’t have
to fool with the acetate film.
Thanks for the recipe!
Hi, Mike…yes, these mini no bake cheesecakes are worth the effort. I wish I could find taller mini cheesecake pans as well. Thanks for your great feedback!?
@Mike, I found these 3 X 3 inch mini push pans on several web pages (Amazon, Walmart, EBay). However from those places they were very pricey. Then I found them on the WebstrauntStore.com website for half the price of the other places. I haven’t tried them yet.
Fat Daddio’s Round Cheesecake Pan, 3 x 3 Inch
I made a test batch and they didn’t set. Any suggestions? I followed the recipe properly.
That could be from a few different things.
1. Overbeating the cheesecake batter.
2. Using low-fat or fat-free cream cheese
3. Not giving the cheesecake enough time to set up (it needs at least 4 hours but preferably 12 hours)
4. Gelatin was not completely dissolved or incorporated into the batter
5. Cream cheese wasn’t at room temp. (the ingredients won’t blend well if the cream cheese isn’t at room temp.)
Hope that helps you get to the bottom of it 🙂