
This post may contain affiliate links. Please read our disclosure policy. As an Amazon Associate, I earn from qualifying purchases.
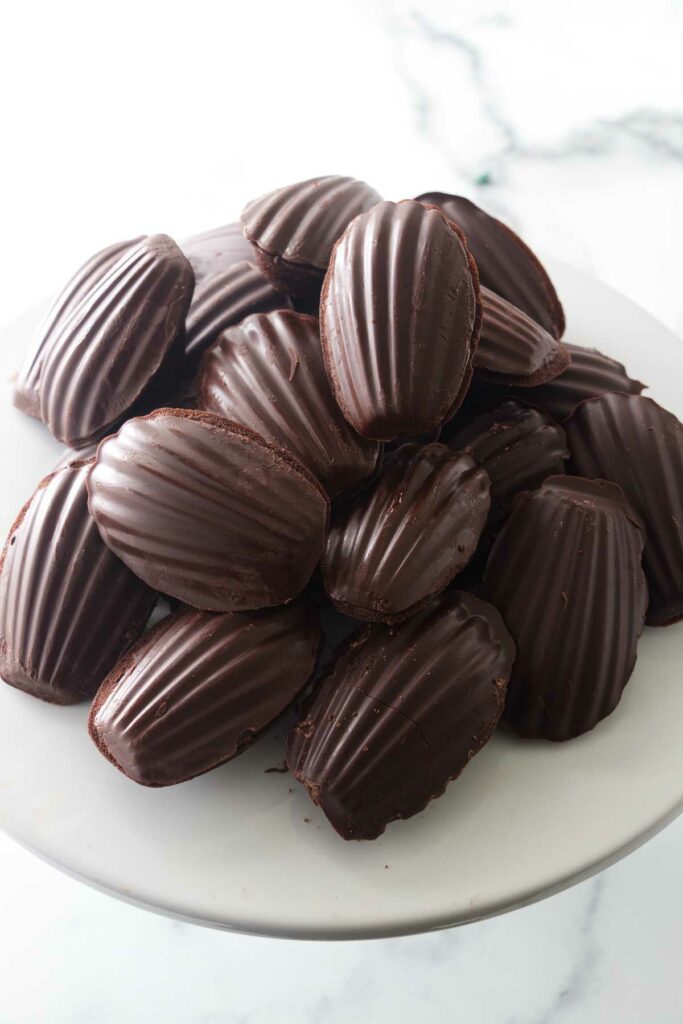
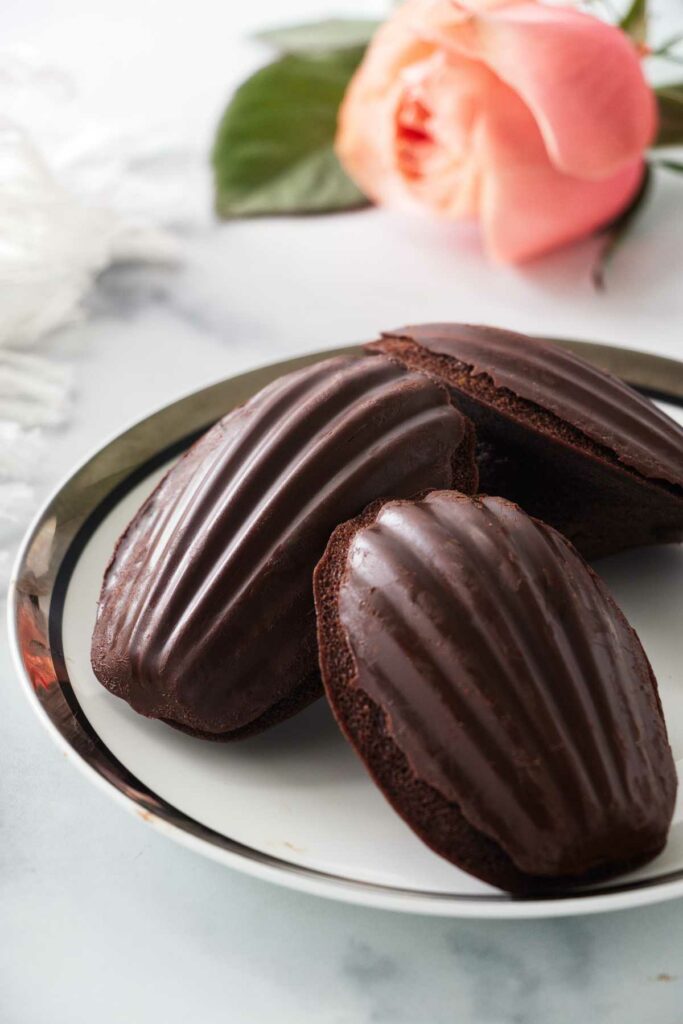
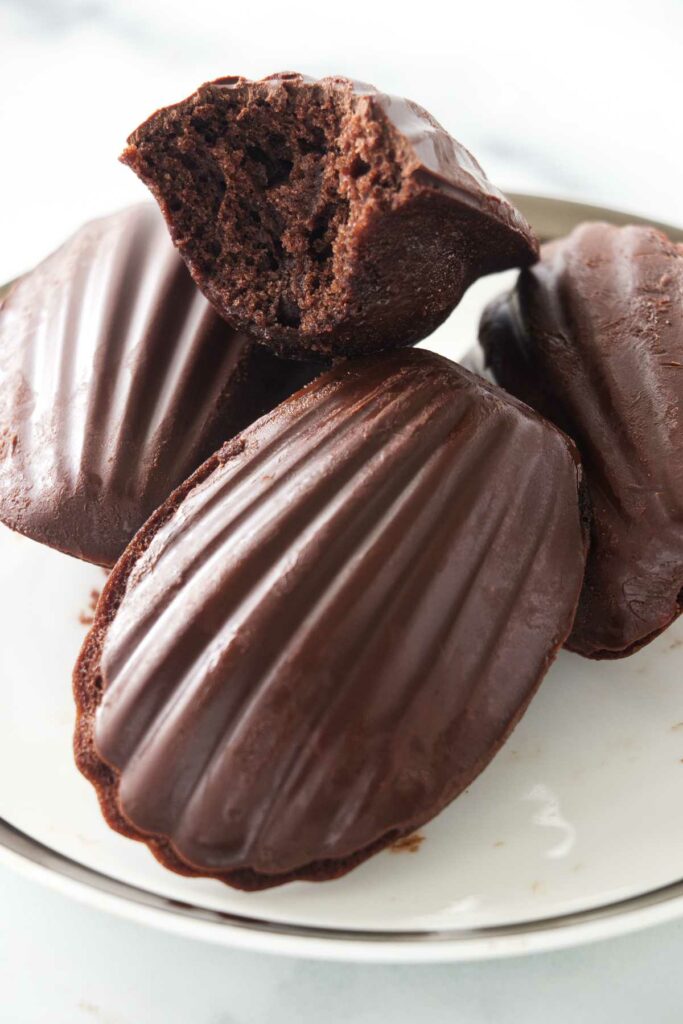
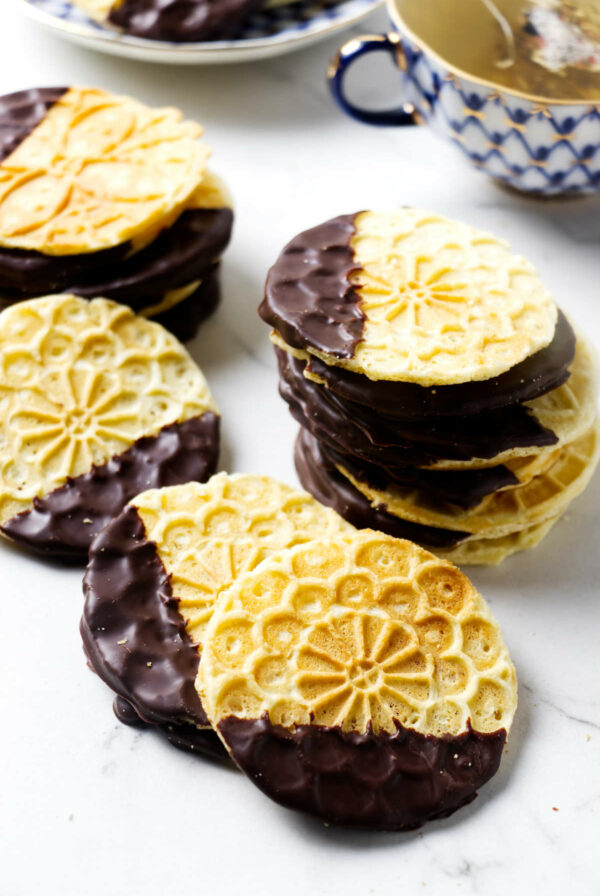
Chocolate madeleines are soft little butter cakes with deep chocolate flavor and a glossy dark chocolate shell. They look polished enough for a cookie tray, but they are still simple enough to make at home without turning your kitchen into a pastry school project.
The coating gives the shell side a crisp chocolate finish and settles into those classic ridges, so you get a madeleine that tastes as good as it looks.
I especially like these for tea parties or dessert trays alongside my classic madeleine cookies. They have the same tender little cake texture, with a dark chocolate finish for the chocolate people at the table.
Why These Chocolate Madeleines Work
I use Dutch-process cocoa because it gives the batter a deeper color and a smoother chocolate flavor than regular cocoa powder.
A little espresso powder pulls its weight here. I like how it makes the chocolate taste richer without making the madeleines taste like coffee.
The chocolate coating covers the shell side cleanly, so you get glossy ridges instead of a half-dipped cookie with chocolate puddled around the edges.
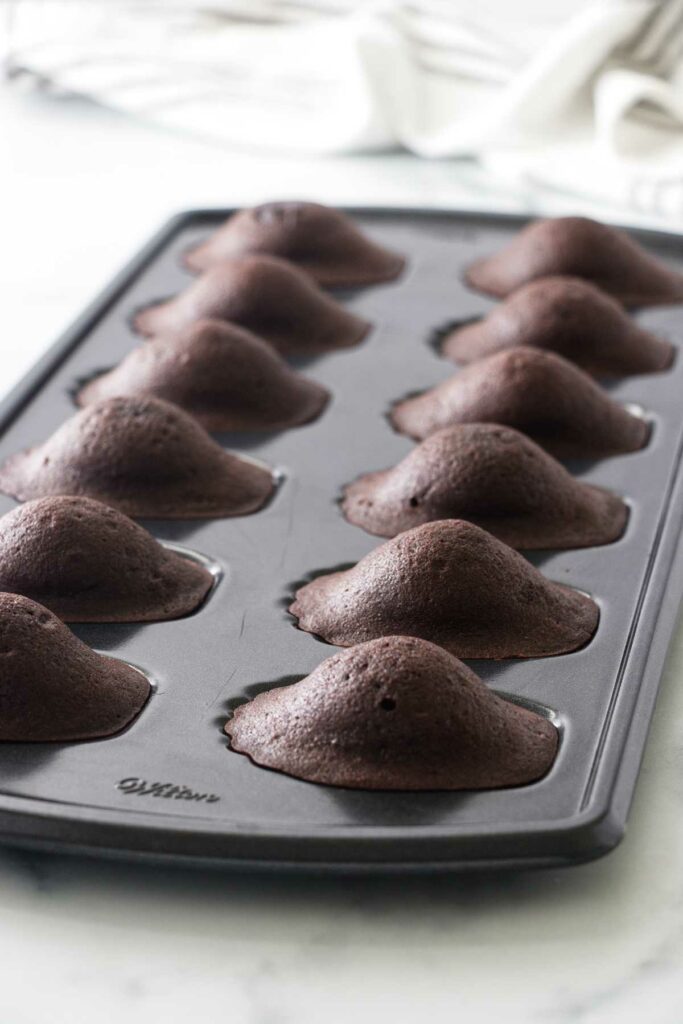
Chilling the batter is worth the wait. It helps the madeleines bake with that classic little hump instead of coming out flat.
When I want to work ahead, I chill the batter overnight or freeze the baked madeleines before coating them.
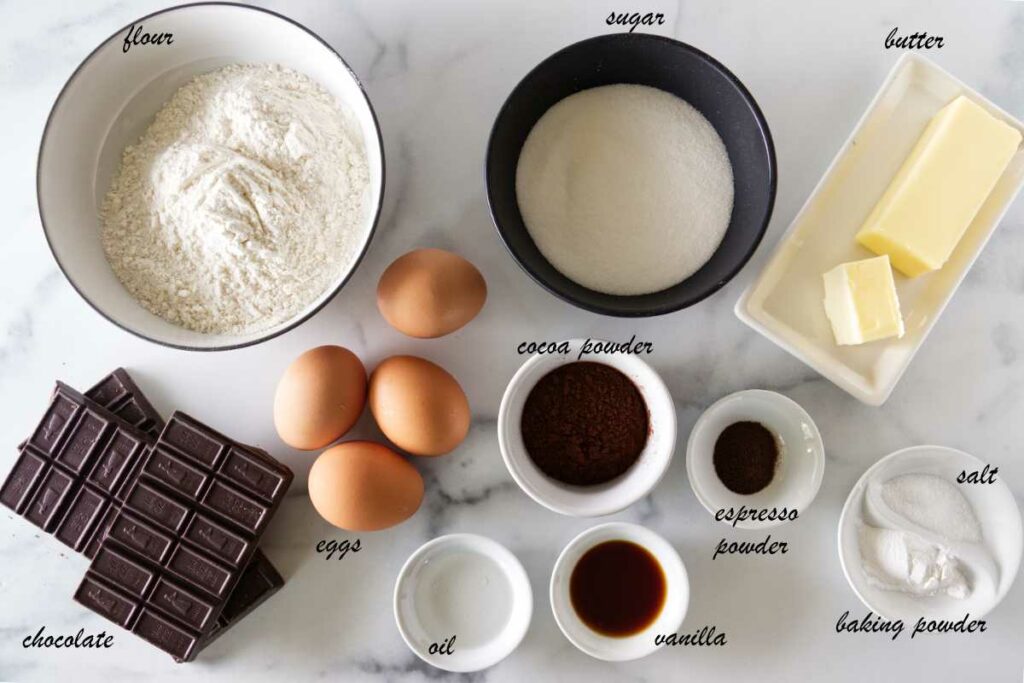
Key Ingredients
Dutch-process cocoa powder: Dutch-process cocoa has a darker color and smoother flavor than natural cocoa. It gives these madeleines a deeper chocolate flavor and a more polished look. Natural cocoa will work but they give the madeleines a lighter color milder flavor.
Espresso powder: Just a small amount makes the chocolate taste fuller. It does not make the madeleines taste like coffee.
Dark or semi-sweet chocolate: Use chopped bar chocolate or baking chocolate for the coating. Chocolate chips do not melt as smoothly because they contain stabilizers.
Butter: Use unsalted butter, melted and cooled. Hot butter can affect the eggs and change the batter texture.
Room-temperature eggs: They blend into the batter more evenly and help keep the crumb light.
Recipe Tips
Chill the batter. This is not the step to rush. A cold batter hitting a hot oven helps create the classic madeleine hump. Chill it for at least 2 hours, or overnight if needed.
Do not overfill the pan. Use about 1 tablespoon of batter per cavity. Too much batter makes the madeleines spread instead of forming that rounded dome.
Prepare the pan carefully. Grease and flour the cavities well, making sure to get into every ridge. You can also dust the pan with cocoa powder instead of flour if you want to keep the shell side darker.
Unmold promptly. Once the madeleines are baked, remove them from the pan right away. Leaving them in the hot pan can dry them out.
Use a towel, not a wire rack. Turn the hot madeleines onto a clean kitchen towel so the soft cakes do not pick up rack marks.
Make sure the pan is dry before adding chocolate. Water and melted chocolate are not friends. Even a little moisture can make the chocolate seize or stick.
These also pair nicely with my chewy pistachio cookies if you are putting together a cookie tray or dessert spread.
Your Questions, Answered
Yes. A madeleine pan gives the cakes their shallow shell shape, scalloped ridges, and classic domed top. There is not a good substitute for it. If you only have one pan, bake in batches and keep the remaining batter chilled.
Chilling the batter helps madeleines bake with their signature hump. The cold batter hits the hot oven, the edges set first, and the center rises. The rest also gives the flour time to hydrate, which improves the texture.
Make sure the pan is completely dry before adding the melted chocolate. Spread the chocolate in a thin, even layer, press the cooled madeleines into the cavities, and chill until set. If they don’t release right away, let the pan sit at room temperature for a few minutes, then try again.
Yes, but the best method is to make the batter ahead or freeze the baked madeleines before coating them. The batter can chill overnight, and uncoated baked madeleines can be frozen for up to 1 month. Add the chocolate coating after thawing for the best texture.
Chocolate Dipped Madeleines
These chocolate madeleines are simple little cakes with a polished finish, and that is exactly why I like them. The batter is straightforward, the chocolate flavor is deep, and the glossy shell makes them feel a little special without adding much extra work.
They are the kind of cookie I like for tea parties and dessert trays. For some flavor variations, try my lavender madeleines or my almond madeleines.
Pin this now to find it later!
Pin It
Easy Chocolate Madeleines
If you make this recipe, please leave a star rating and comment.
Equipment
Ingredients
- 1 ¼ cups all-purpose flour, 150 grams
- ⅔ cup granulated sugar, 130 grams
- 1 teaspoon baking powder
- ½ teaspoon salt
- ½ teaspoon instant espresso powder
- ¼ cup Dutch processed cocoa powder, 25 grams
- 4 large eggs, room temperature
- 1 teaspoon vanilla extract
- 10 tablespoons butter, melted and cooled to room temperature
Chocolate Glaze:
- 12 ounces semi-sweet chocolate, or dark chocolate, chopped; 340 grams
- 2 teaspoon vegetable oil
Instructions
For the Batter:
- In a medium size bowl, whisk together the flour, sugar, baking powder salt, espresso and cocoa powder.
- In a separate dish, whisk the eggs and vanilla extract together then whisk the mixture into the flour mixture until combined.
- Pour the melted butter into the batter and stir until fully incorporated and the batter is smooth and shiny.
- Cover the bowl with plastic wrap and refrigerate for at least 2 hours to chill.
Bake the Madeleine cookies:
- Heat the oven to 375°F and grease/flour the madeleine pan. Alternatively, coat the pan with a flour/oil spray.
- Remove the batter from the refrigerator and scoop one tablespoon into each shell-shape cavity of the pan.
- Transfer the pan to the oven and bake for 8-9 minutes until the edges look lightly crisp and the cakes spring back when lightly touched. Remove from the oven and immediately flip them onto a kitchen towel, pattern side down, and cool for 10-15 minutes before glazing with the chocolate.
To Glaze the Chocolate Madeleines:
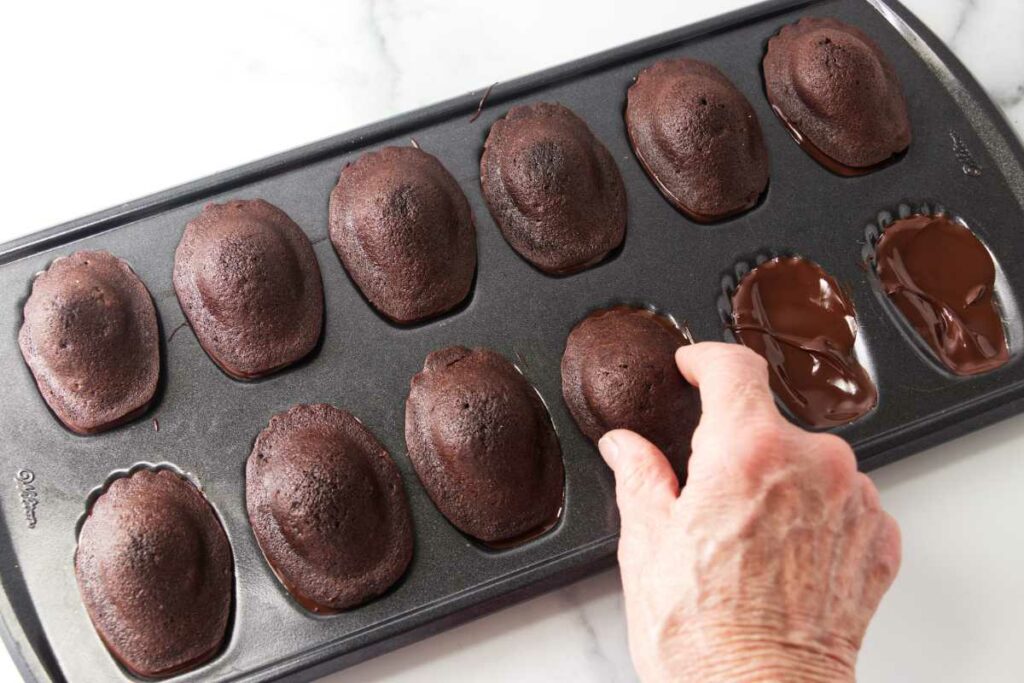
- Wash and dry the madeleine pan, making sure it’s completely dry before adding the chocolate. Even a trace of moisture can cause the chocolate to stick.
- In a double-boiler set over simmering water or use a microwave safe dish, melt the chocolate and oil, stirring to a smooth consistency.
- Spoon about 1 tablespoon of melted chocolate into each cavity of the madeleine pan and spread it with the back of the spoon to create a smooth, even layer. Aim for a thin coating that covers the ridges but doesn’t pool in the bottom. Too much chocolate can make the cookies hard to unmold once chilled.
- Place the madeleines back into the chocolate-coated cavities, pressing them down lightly.
- Transfer the filled pan to the freezer for 15–20 minutes, or until the chocolate feels firm when lightly touched. Avoid overchilling. If the chocolate gets too cold, it can crack or cling to the pan. To remove, let the pan rest at room temperature for a few minutes, then slide a small knife under one edge of each madeleine and gently lift to pop it out.
Notes
Nutrition
Nutrition information is automatically calculated, so should only be used as an approximation.
 Like this recipe? Rate & comment below!


What a mess! Followed instructions to the letter. Went well until trying to get Madeline’s out of chocolate coated pan. It looked like it would work, sad to say it did not. Made a mess of 4. Put the tray back in oven to loosen chocolate. Brought out and the Madeline’s released from pan. If the taste is good, will make again without chocolate. I do not recommend this method for glazing them.
Thanks for sharing your experience. It sounds like the chocolate may have firmed up a little too much before releasing, which can definitely make it cling to the pan. Warming the pan again (like you did) is actually the perfect fix! The only tricky part is not letting it get too warm, since that can make the chocolate melt and smear instead of releasing cleanly. I’ll add a quick note in the recipe so others know to warm it just enough to loosen the chocolate. I really appreciate you taking the time to share what happened!
Everything was great until I needed to remove the cakes from the pan after adding the chocolate topping….I popped them into the almost cool oven for a minute to soften the chocolate…then sweet the madeleine thru the chocolate and then to the rack…worked…nobody will know the difference!
That was a clever save! Sometimes a little kitchen improvisation is all it takes. Thanks for the comment.
Can I substitute gluten free flour and have them turn out the same? I’m new to making Madelines. Thanks.
Madelines can be made gluten-free, but the results will depend on the flour blend you use. Different blends can give you varying textures. I recommend starting with a high-quality gluten-free all-purpose flour blend that includes xanthan gum or guar gum for structure. I have had success with King Arthur Measure for Measure and Cup 4 Cup but there are other good blends. You may have to experiment with a few to find the one that you like the best.
@Dahn Boquist, thanks. I’ll try that
They turned out bakery perfect, Pat! My husband would love them with white chocolate glaze.
Thanks, Angie!