
This post may contain affiliate links. Please read our disclosure policy. As an Amazon Associate, I earn from qualifying purchases.
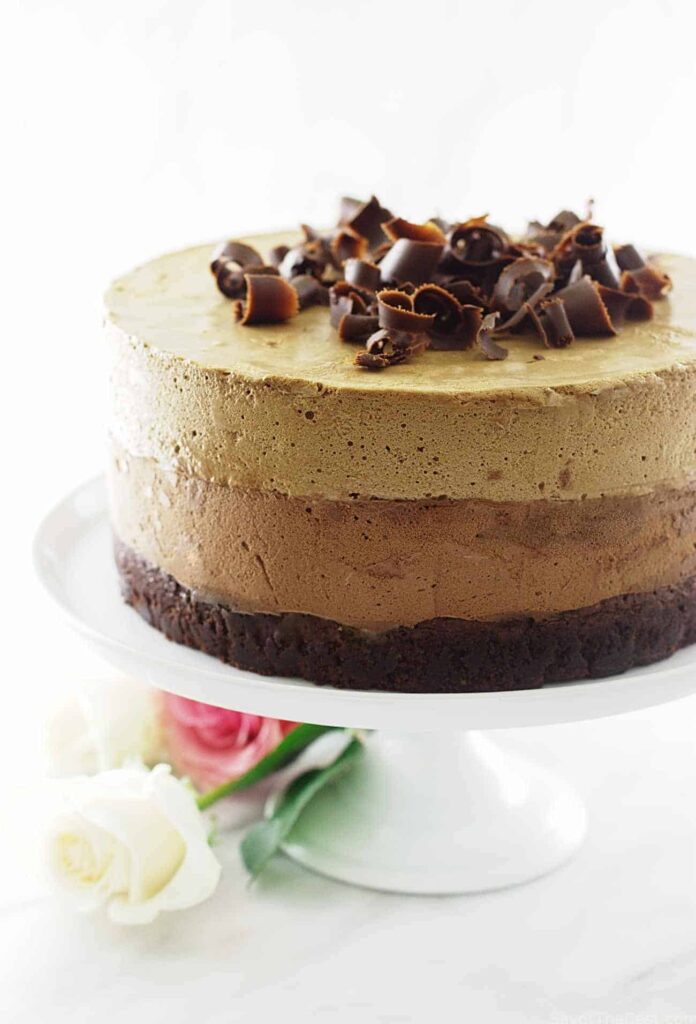
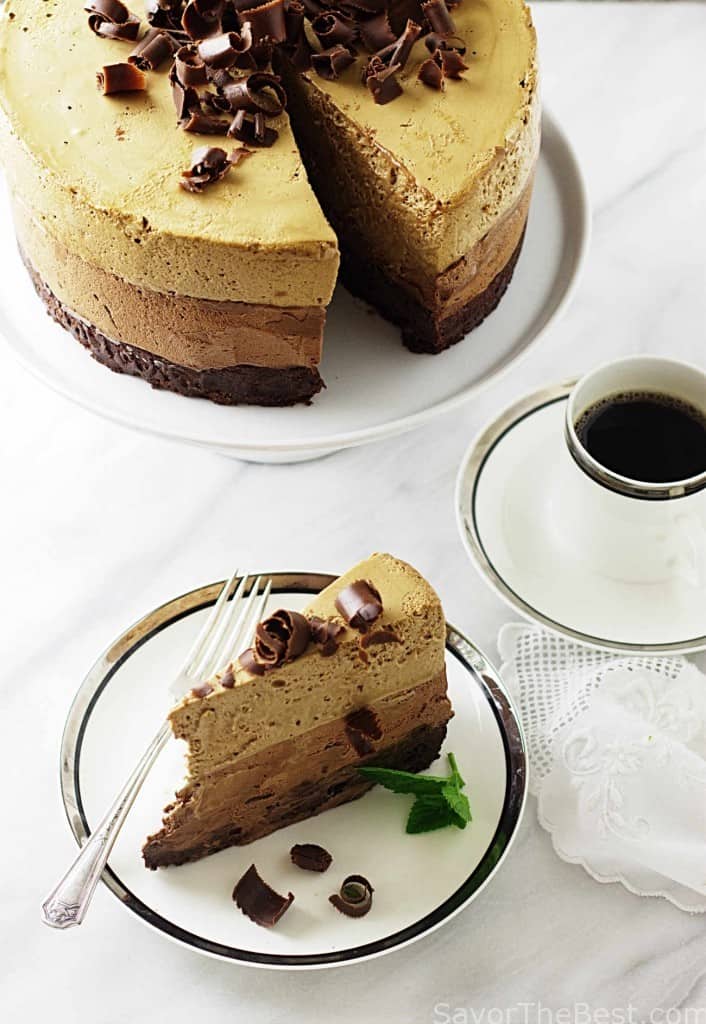
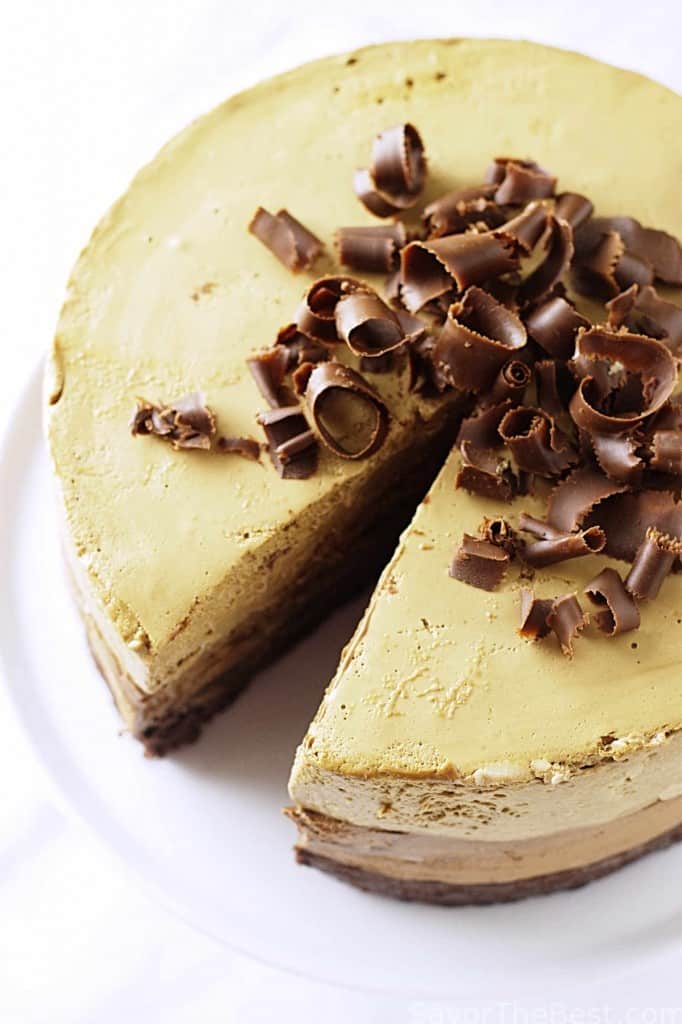
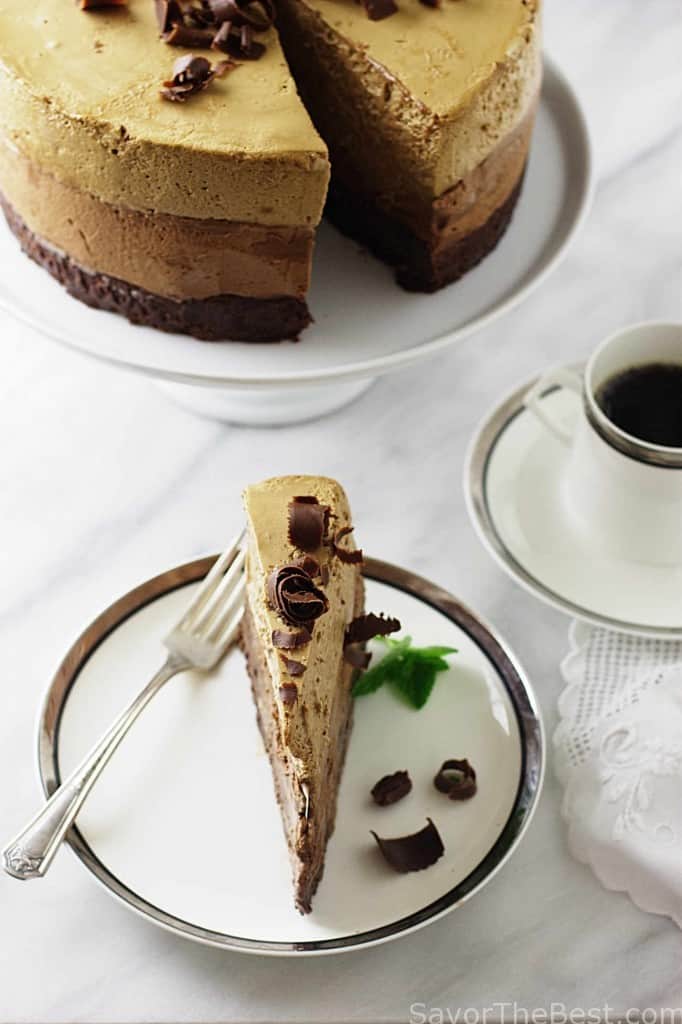
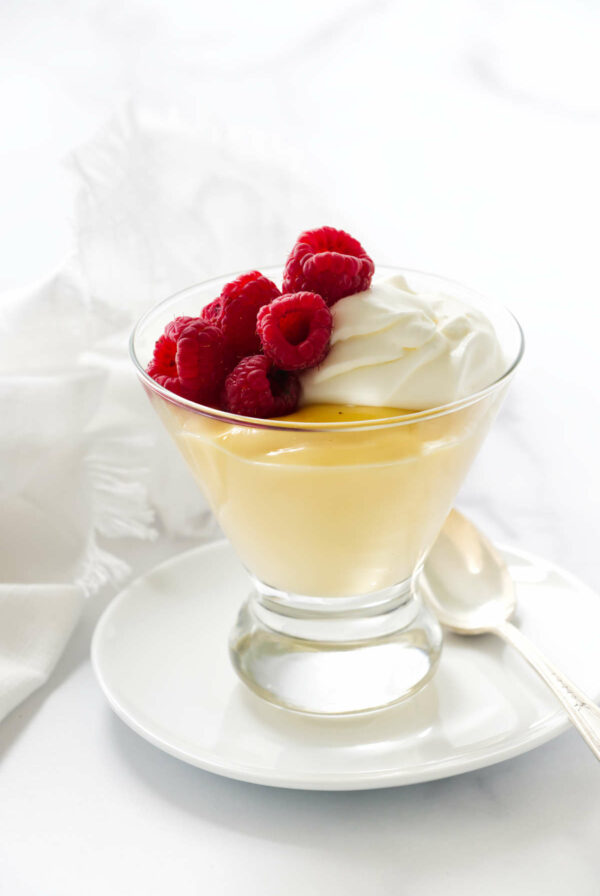
From the very first bite, this chocolate amaretto-espresso mousse cake is a taste sensation! You will be delighted as you dip your spoon into the top layer of the decadent, chocolate espresso mousse.
Move on down to the next layer and experience the flavor of this rich, fluffy amaretto mousse. The base layer is a moist fudgy, gooey, chocolate brownie loaded with crunchy cocoa nibs. Oh, yes, please!
Our grandson Josh, married his best friend Sara this last weekend. Dahn and I made individual mousse tower desserts to serve at the rehearsal dinner. This chocolate amaretto-espresso mousse cake is a larger version of the mini-tower desserts served at the wedding rehearsal dinner for Joshua and Sara.
We baked the brownie base in a nine-inch springform pan. When the brownie cooled, we lined the pan ring with a parchment paper collar. The collar is extended above the rim of the pan ring to provide height and stability for the two additional mousse layers.
Although the instructions listed in the recipe card look daunting, this is not a complicated dessert. You can easily construct it by stages in advance and frozen.
This mousse cake is rich, decadent and a thin slice is very satisfying. You also have the option of creating the individual mini-towers that Dahn and I served at the rehearsal dinner.
Our grandson, Joshua, and his new bride, Sara, had a beautiful wedding on July 30, 2016. Dahn and I were honored to prepare the dessert for the catered rehearsal dinner.
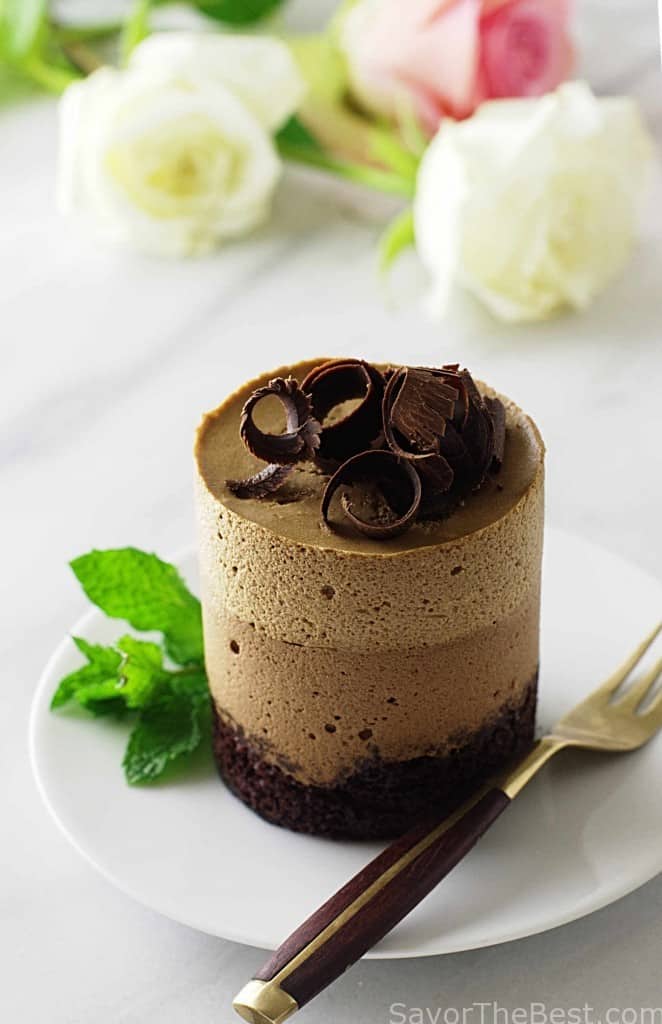
This Chocolate Amaretto Espresso Mousse Cake May Also be made as Mini-Mousse Towers:
We chose to serve chocolate amaretto-espresso mini-mousse towers and together we made 55 of these babies. The chocolate amaretto-espresso mousse cake is a larger version of the mini-tower desserts served at the dinner.
Yes, that does sound overwhelming, doesn’t it! But… this was a fun mother-daughter project and it was prepared in stages which prolonged our ‘fun’ time. The bottom layer was from our recipe of einkorn brownies with cocoa nibs. The brownies were baked and prepared an entire month in advance.
After the brownies were baked and cooled we used a cookie cutter to cut the seven, eight-inch square brownie sheets into two-and-one-half inch circles.
After they were cut they were frozen, vacuum-sealed and placed back into the freezer until we were ready to make the two additional layers of mousse.
One week before the wedding Dahn and I spent an entire day preparing and assembling the additional two layers of mousse. We used our recipe for chocolate amaretto mousse as one layer and altered the recipe using milk chocolate and espresso instant coffee for the top layer. Since milk chocolate makes a thinner mousse we added a little gelatin to give it stability.
Finishing the Chocolate Amaretto-Espresso Mousse Cake Mini-Towers:
Each brownie round was wrapped with a three-inch clear acetate collar, and assembled with the brownie as the base bottom layer, then the amaretto mousse layer, and the espresso mousse as the top layer.
They were then finished off with the chocolate curls. The acetate cake collars can be purchased on Amazon or you can make your own from parchment paper as directed in our recipe.
It was nearly a three-hour drive from our house to the venue site. We needed to transport the mousse tower desserts frozen and in coolers two days before the rehearsal dinner.
We were fortunate to have enough freezer space at the venue for all the desserts. The clear acetate collar was left on the desserts which protected it during travel time. The collar was removed while they were still frozen just before serving. After removing the collar and a two-hour refrigerator-thaw they were served and consumed with delight.
The Wedding:
The wedding venue was held on Saturday at Ashe & Alder, which is located in a valley surrounded by the Cascades and with the White Horse Mountain as a backdrop. Owners, Sean and Cecillia are very organized and have a beautiful venue. The wedding was an evening event attended with more than 200 guests. Lights were strung up in the trees and around the dance floor which provided a lovely ambiance.
This was the first non-traditional wedding that I have ever attended. More than 200 guests attended the event and it was catered by Nosh, a Seattle-based food truck. They served an impressive, savory fried rabbit, a hefty, delicious meatloaf sandwich and the best fish and chips that I have ever tasted!
Josh and Sara had seven bridesmaids, seven groomsmen, the cutest curly red-haired toddler named Kinsley, as flower girl and our five-year-old grandson, Sheamus as ring bearer. Even their two furry pooches, Riquour and Turbo, were walked down the aisle by Joshua’s dear cousin, Maddie and good friend Russel to witness this event.
It was so special that Joshua chose to escort each set of parents and grandparents down the aisle to their seats. Sara looked beautiful in her dress and was escorted down the aisle by her mother and father; one parent on each side of her and they both handed Sara off to Joshua.
Sara’s brother, Evan played his saxophone during the procession, then he officiated the vows and pronounced them husband and wife!
Next…..it was Party-Time! 🙂
More Chilled or Frozen Desserts
- Chocolate Caramel Swirl Cheesecake
- Roasted Figs in Goat Cheese Custard
- Chocolate Peanut Butter Tart
- Peaches and Cream Tart
- 31 Cool Summer Dessert Ideas
Pin this now to find it later!
Pin It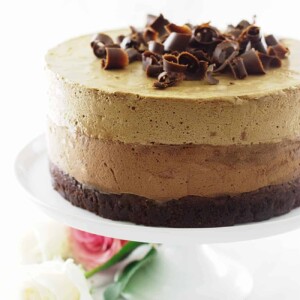
Chocolate Amaretto-Espresso Mousse Cake
If you make this recipe, please leave a star rating and comment.
Ingredients
For the Brownie Base Layer:
- 8 ounces bittersweet chocolate, chopped
- 12 tablespoons butter, 170 grams
- 1 ½ cup granulated sugar, 300 grams or coconut sugar
- 1 teaspoon instant coffee espresso powder
- ¼ teaspoon salt
- 4 large eggs, whisked well
- 1 teaspoon vanilla extract
- 1 cup all-purpose flour
- ½ cup cocoa nibs, 60 grams
For the Amaretto Mousse Layer:
- 10 ounces bitter sweet or semi-sweet chocolate
- 5 egg yolks
- ¼ cup Amaretto liqueur
- 3 egg whites, room temperature
- ½ cup granulated sugar, divided
- 2 teaspoons vanilla extract
- 1 ¼ cups heavy cream, chilled
To Make the Espresso Mousse:
- 10 ounces milk chocolate
- 5 egg yolks
- 1 packet unflavored gelatin powder, 7 grams or 2½ teaspoons
- 2 tablespoons espresso powdered coffee
- ½ cup water
- 3 egg whites, room temperature
- ½ cup granulated sugar, divided
- 2 teaspoons vanilla extract
- 1 ¼ cups heavy cream, chilled
Garnishment
- Chocolate curls, optional
Instructions
- Preheat oven to 325°F Fit a piece of parchment paper to the bottom of a 9-inch springform pan that has 3-inch sides. Spray the with cooking oil.
To Make the Brownie Base Layer:
- In a large saucepan set over low heat, add the chocolate and butter, stirring constantly until they are melted. Remove the saucepan from the heat and add the sugar, instant espresso powder and salt, stir until well combined.Let cool slightly, then gradually stir in the beaten eggs and the vanilla extract. Add the flour and stir until blended. Fold the cocoa nibs into the batter and pour into the prepared baking pan.
- Bake the brownies in the center of the oven for 30-32 minutes, it should still be a little jiggly in the center but will firm up as it cools. Transfer to a cooling rack. Once cool, loosen the edges with a sharp knife.
To Make the Paper Cake Collar:
- Measure around the pan and cut a piece of parchment paper the length, plus a couple inches to overlap. Fold the parchment paper to a double thickness that is 5-inches wide.
- Clean the pan ring and wipe it dry, spray the inside of the ring with cooking oil and place it on the serving plate, fitting it around the brownie layer with the paper collar between the pan side and the brownie, flush with the serving plate. Snap the ring latch closed. The brownie layer will serve as the bottom of the cake and you will not need the metal pan bottom. Set aside while preparing the amaretto mousse.
For the Amaretto Mousse Layer:
- Chop the chocolate into pieces and add to the top of a double boiler which is set over barely simmering water and allow to melt undisturbed.
- Meanwhile, in a large mixing bowl beat the egg yolks until they are thick and pale, beat in the amaretto. Add the melted chocolate by spoonfuls, beating until the mixture is combined well.
- *Optional: For a very smooth textured mousse, pass the chocolate mixture through a fine mesh sieve, scraping the outside of the sieve, then proceed with the egg whites and whipped cream.
- In another bowl beat the egg whites until they just hold soft peaks, beat in ¼ cup of the sugar a little at a time and continue to beat the meringue until it holds stiff peaks. Beat in the vanilla. Stir one-third of the meringue into the chocolate mixture and fold in the remaining meringue.
- In a chilled bowl beat 1 ¼ cups of the heavy cream until it holds soft peaks, beat in the remaining ¼ cup of sugar and beat the cream until it holds stiff peaks. Fold the whipped cream into the chocolate mixture, gently incorporating it completely.
- Pour the mousse into the prepared springform pan, directly on top of the brownie layer, smoothing the top. Drape a sheet of plastic wrap lightly over the cake and refrigerate until until firm. About 2 hours.
To Make the Espresso Mousse:
- Chop the chocolate into pieces and add to the top of a double boiler which is set over barely simmering water and allow to melt undisturbed.
- While the chocolate is melting, sprinkle the gelatin into ¼ cup of cold water and set aside for 1 minute to bloom.
- In a small saucepan bring the ½ cup of water to a boil, remove the pan from the heat and add the espresso powder, stirring to dissolve. Add the softened gelatin, stir to combine with the espresso and set aside to cool.
- In a large mixing bowl beat the egg yolks until they are thick and pale, beat in the cooled espresso mixture. Add the melted chocolate by spoonfuls, beating until the mixture is combined well.
- Optional: For a very smooth textured mousse, pass the chocolate mixture through a fine mesh sieve, scraping the outside of the sieve, then proceed with the egg whites and whip cream.I
- n another bowl beat the egg whites until they just hold soft peaks, beat in ¼ cup of the sugar a little at a time and continue to beat the meringue until it holds stiff peaks. Beat in the vanilla. Stir one-third of the meringue into the chocolate mixture and fold in the remaining meringue.
- In a chilled bowl beat 1 ¼ cups of the heavy cream until it holds soft peaks, beat in the remaining ¼ cup of sugar and beat the cream until it holds stiff peaks. Fold the whipped cream into the chocolate mixture, gently incorporating it completely.
- Remove the pan with the brownie and the amaretto mousse layer from the refrigerator, discarding the plastic wrap drape.
- Pour the espresso mousse into the prepared pan on top of the firm amaretto mousse layer. There should still be about an inch of the collar extended. Smooth the top, drape a sheet of plastic wrap lightly over the cake, not touching the mousse, and refrigerate until set, then transfer to the freezer to firm up, at least 2 hours. The collar will remove more cleanly if the cake is very cold.
- Transfer the mousse cake from the freezer and release the metal ring. Carefully, peel the parchment paper collar from the side of the mousse. If the mousse seems to be sticking to the collar return it to the freezer for a little longer. You will not need to reposition the metal pan ring.
- Once the collar has been removed, garnish with chocolate curls and place the layered mousse cake into the refrigerator until serving time. Alternatively, the cake may be frozen for up to one week, remove from the freezer and refrigerate for 2 hours or more, to thaw completely. Garnish with chocolate curls and serve.
- To slice the cake with clean cuts, dip the knife into hot water and wipe clean after each slice.
Notes
Nutrition
Nutrition information is automatically calculated, so should only be used as an approximation.
 Like this recipe? Rate & comment below!


Hi Pat,
i’m making this cake for my Fiancee’s Birthday but i’m in a pickle with the gelatine.
How much a pack is? I’m in the UK and we have a pack that’s 12g and a vegetable pack that is 6,5g.
Which quantity is best?
Thanks
The packets sold here are 7 grams of gelatin powder, which is about 2½ teaspoons. Thanks for the question, I will update the recipe with that additional information.
Looks decadent!! I was wondering, you spoke a lot about making individual tower cakes, but, unless I missed it, you never indicated what you use to make them. Can you advise as to what type of pan you used? Thank you. And could you please email me the info? I don’t always keep the post up to check out the comments later in case that’s the only way you answer. Thanks again.
I used an 8x8x2-inch pan to bake the brownies. Once the brownies were completely cool, I cut them into rounds using a 2.5-inch biscuit cutter.
To build each tower, I wrapped a 3-inch high clear acetate strip around each brownie round, then added a layer of amaretto mousse. After that layer set in the fridge, I added the final espresso mousse layer and chilled them again until fully set.
I’ll also email this info to you so you don’t have to worry about checking back. Let us know if you give it a try. We’d love to hear how they turn out!