
This post may contain affiliate links. Please read our disclosure policy. As an Amazon Associate, I earn from qualifying purchases.
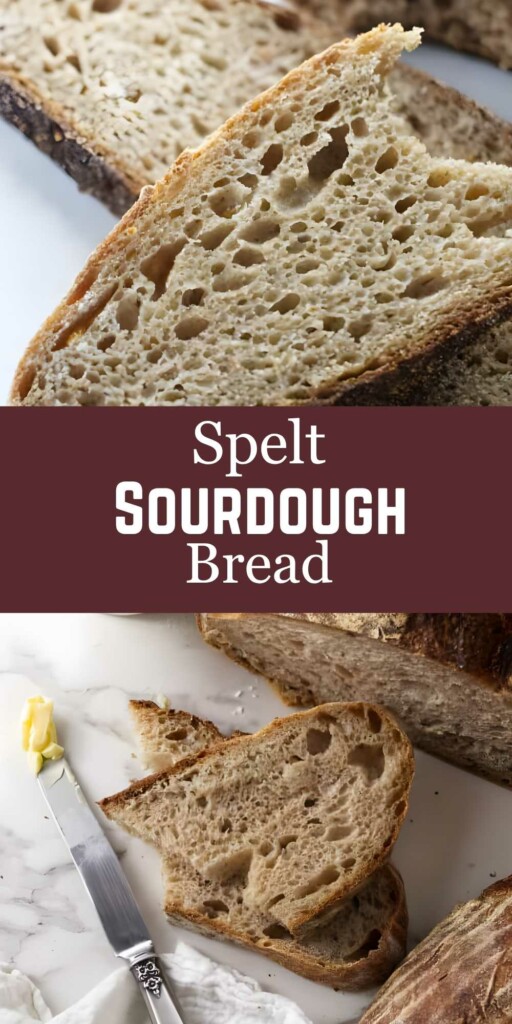
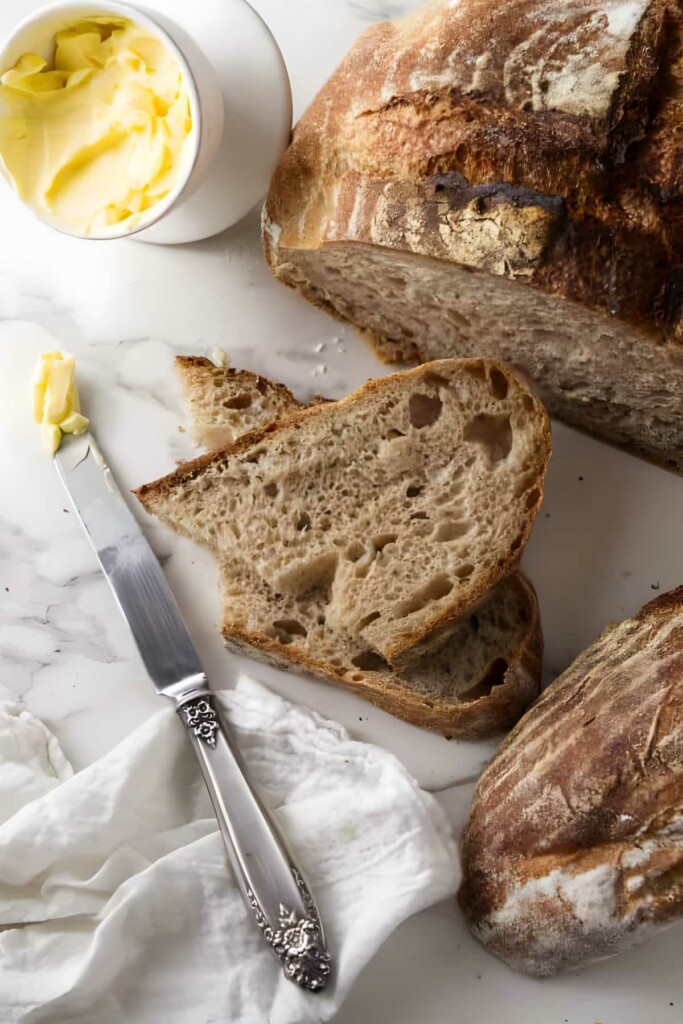
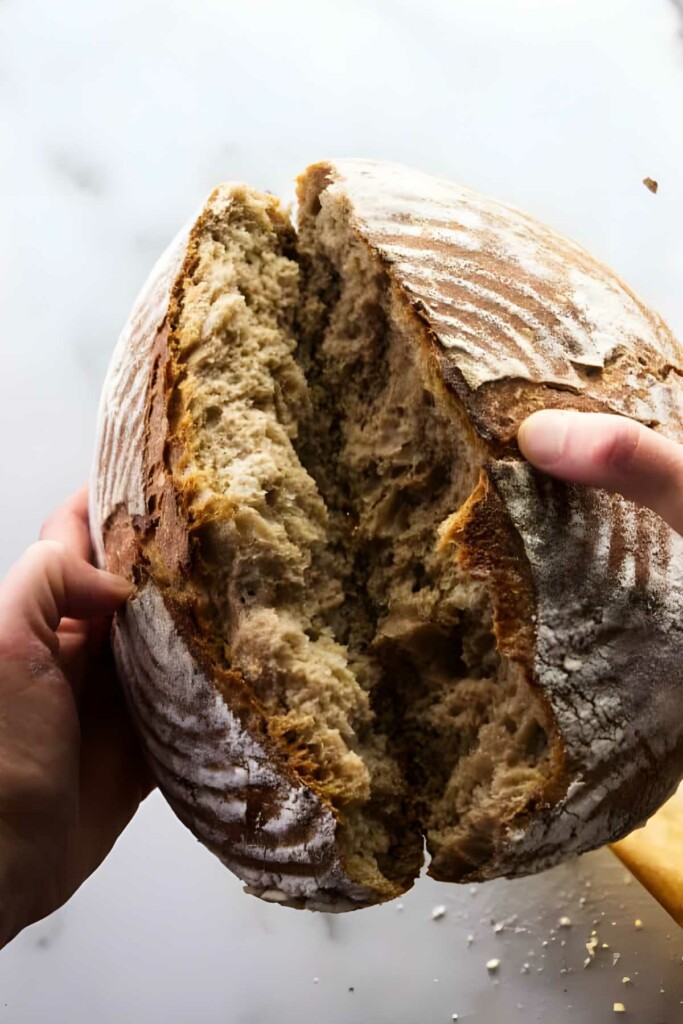
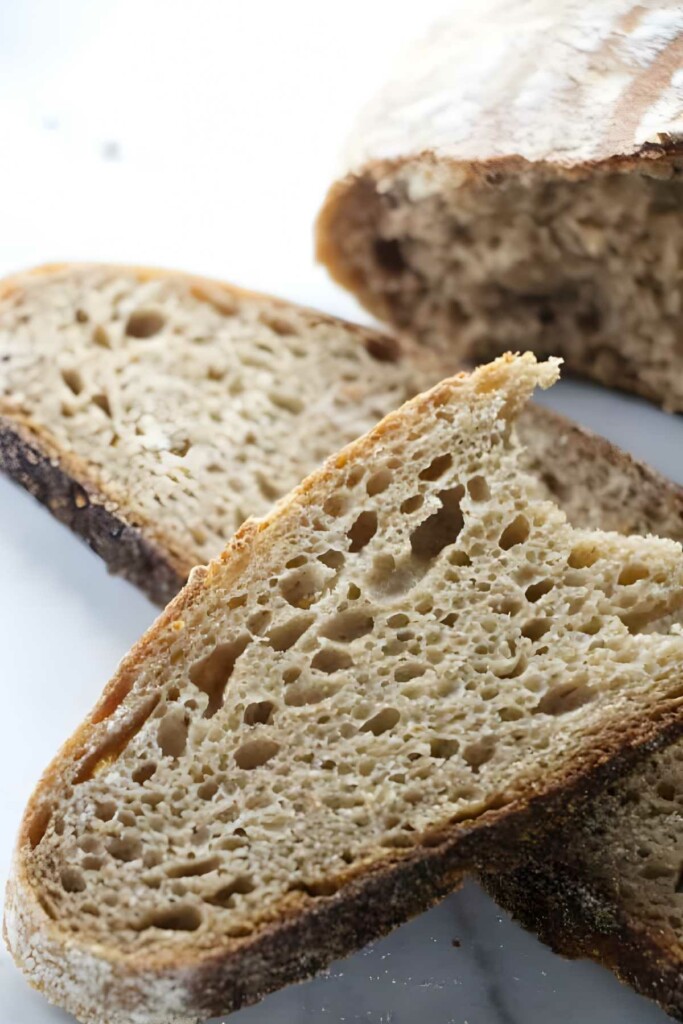
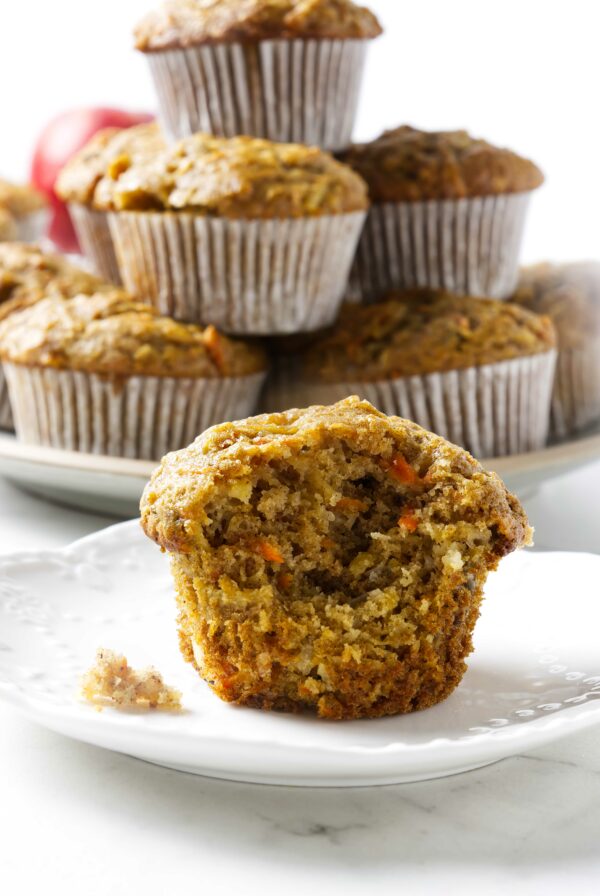
This 100% whole wheat spelt sourdough bread is the real deal. No white flour and no commercial yeast. Just four ingredients and that naturally tangy, chewy, artisan-style crumb. The whole grain spelt gives it a nutty flavor and rustic texture. If you’re after a hearty loaf with depth and character, this one earns a spot on repeat.
If you’re after something more classic, you can try my sourdough bread made with white flour.
Here is Why This Sourdough Spelt Bread Recipe Works
Uses a natural sourdough starter: No commercial yeast here. Just good old fermentation doing its thing for depth and complexity. If you need one, here’s how to make a sourdough starter with pineapple juice.
Spelt flour keeps things interesting: It’s nuttier, softer, and brings a rustic flavor that makes it a favorite for whole grain baking. Want more ways to use it? Try my spelt banana bread for a naturally sweet treat or this hearty spelt Irish soda bread.
Flexible proofing options: Whether you want it same day or tomorrow, this dough plays nice with room temp or cold fermentation.
No fancy equipment needed: Sure, a Dutch oven helps, but you can pull this off with a baking sheet if you need to.
Want to try something more relaxed with your starter? My sourdough focaccia is low-effort, no-knead, and perfect for sandwiches
Recipe Tips
Weigh your ingredients: Measuring by cups is fine in theory, but spelt is temperamental. A scale keeps things precise and saves you from guesswork.
Don’t add extra flour: Spelt gets dense fast if you add too much flour. Embrace the stickiness and keep your hands wet instead.
Don’t wait for a full double rise: Spelt doesn’t have the gluten muscle for dramatic lifts. Aim for 1½ to just under 2 times the original size. Any more, and it can collapse.
Flour your proofing basket: Use a mix of rice and all-purpose flour to keep the dough from welding itself to your towel or basket.
Be patient with the sticky stage: Yes, it’s messy. No, it doesn’t mean you did something wrong. That wet dough is exactly what gives you an open crumb and soft interior.
Working with ancient grains? Einkorn, like spelt, has a weaker gluten structure and benefits from gentle handling. If you’re curious, check out my einkorn sourdough bread recipe.
Storing Leftovers
Refrigerate: Store leftover slices in an airtight container at room temp for up to 2 days, or refrigerate for up to 5 days if your kitchen runs warm.
Freeze: Wrap slices or the whole loaf tightly in plastic, then foil, and freeze for up to 2 months. Thaw at room temp before reheating.
Reheat: Toast slices straight from the fridge or freezer. If you’re reviving a whole loaf, warm it in a 350°F oven for about 10–15 minutes.
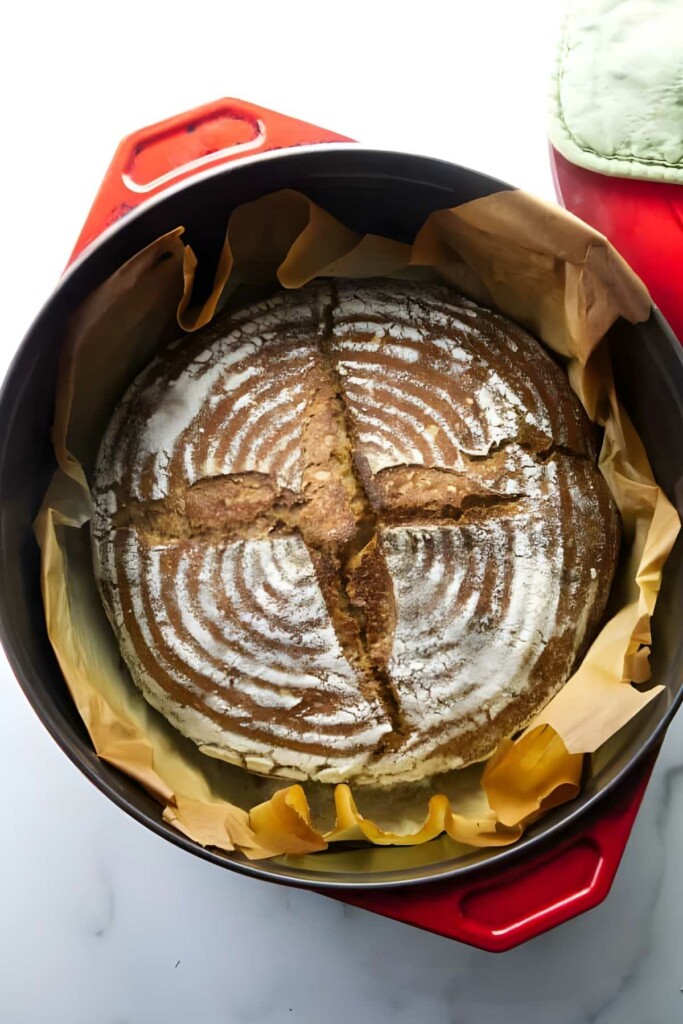
100% Whole Wheat Spelt Sourdough Bread
This 100% whole wheat spelt sourdough is simple, hearty, and full of character. It lets the spelt do what it does best; add a nutty flavor, a tender crumb, and a rustic feel that makes each slice feel homemade in the best way. Once you’ve made it a time or two, it settles into that reliable, keep-it-in-the-rotation kind of recipe.
Pin this now to find it later!
Pin It
100% Spelt Sourdough Bread
If you make this recipe, please leave a star rating and comment.
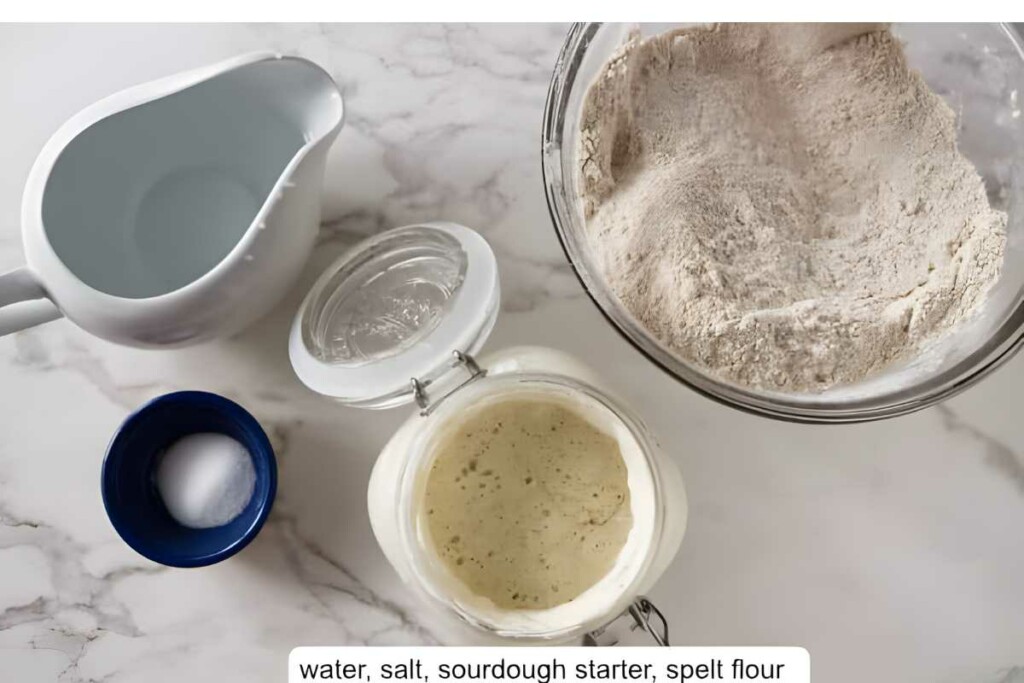
Ingredients
- 1 cup active sourdough starter, (240 grams)
- 1 ¾ cups warm water, (413 grams)
- 4 ¼ to 5 ¼ cups whole wheat spelt flour, (550 to 680 grams)
- 2 teaspoons salt, (12 grams)
Instructions
- Combine all the ingredients in the bowl and stir until it is well combined. The dough will have a rough, chunky look.
- Dump the dough onto a work surface and knead the dough with your hands until it is smooth. Approximately 10 to 12 minutes. (Essentially, you are massaging the dough by stretching and pushing. This will help develop the gluten.) At this stage, it will be wet and sticky. Try not to add more flour or your finished bread will be dense and heavy. The dough will stick to your hands and feel messy but if you get your hands wet it won't stick as easily.
- Place the dough into an oiled bowl and turn it so oil coats the top of the dough. Cover with plastic wrap and let it sit at room temperature for 3 to 6 hours (see notes) or in the refrigerator overnight. (A longer proof time in the fridge will give the bread a more complex, sourdough flavor.)
- Turn the dough out onto a work surface and form it into a round ball. (See notes)
- Place the ball of dough into a proofing basket or any container that is the shape that you want your bread to be shaped. (See notes)
- Let the dough rise again a second time for 3 to 6 hours** at room temperature until almost doubled in size. (Or you could let it rise in the fridge overnight for 12 to 15 hours)
- Preheat the oven to 450°F. Place the Dutch oven inside so it gets hot. It should take 20 to 30 minutes to preheat the Dutch oven.
- Place a piece of parchment on a board then lay it on top of the proofing basket. Flip the board and basket so the basket is on top then remove the basket.
- When the oven is hot, use the parchment paper to place the bread into the Dutch oven. Make a slash in the loaf with a sharp knife. For an extra burst of steam and a slightly higher rise, spray the dough with a bit of water.
- Bake for 20 minutes then remove the lid and finish baking for another to 30 to 35 minutes.
- Let the bread cool completely before slicing it.
Video
Notes
Nutrition
Nutrition information is automatically calculated, so should only be used as an approximation.
 Like this recipe? Rate & comment below!


I havenow made this twice and each time I have a very flat boule. I have followed your instructions exactly –the first time did not use the refrigerator for proofing and the second time I did. When I slashed the uncooked loaf it was nice and high, but when it came out of the dutch oven after 20 minutes, it was pretty flat. Your recipe calls for no shaping other than putting dough into banneton. Other loaves I have made (not spelt) I do two separate shapings before putting the shaped dough into the bannaton. Could that be why I am getting no spring? Another site I looked at suggested that might be my problem
It sounds like the dough over proofed. Spelt does not have a strong gluten structure so you can’t let it rise as high as regular bread or it will collapse.
Hii! I just made this recipe and it’s amazing! I only made part of the recipe, to try it out, so I’d like to make an actual sized loaf now.
My question is why you’re not using stretch & folds in this recipe? I’ve read online this does cause a more elastic dough with open crumb, and I’ve seen it being used for spelt recipes aswell. What would change in the recipe if I’d wanted to try out that technique?
I’m so glad you enjoyed the recipe! For this particular recipe, I aimed to make it more approachable for beginner bakers, which is why I didn’t include the stretch and fold technique. That said, the recipe will absolutely work with the stretch and fold method if you’d like to give it a try.
If you incorporate the stretch and fold technique, you’ll get a dough with a slight improved elasticity and a more open crumb structure. However, keep in mind that spelt flour behaves differently than regular flour, so the results may will not be as pronounced.
@Dahn Boquist, Would you skip the kneading part of the recipe and replace that with the stretch and folds or would you do both? (In case you want to try and incorporate the stretch n fold technique)
If you know how to do stretch and folds then I would use that. It is a great technique for high hydration dough and for bread with a more delicate gluten structure.
Hi Dahn
Another question from me 🙂
When I make this bread the finished product has a more brown color than yours (judging from the pictures and the video), both inside and outside on the crust. Any idea why this could be? Yours look much lighter color on the inside, more like a white sourdough bread if that makes sense and mine looks more like a rye bread almost. I am using 100% wholegrain organic spelt and my starter is a mix between wholegrain spelt and all purpose flour
Thanks!
/Sam
Hi Sam, Thanks for the question. I notice that at times as well. Some whole grain spelt flours can be darker than others. I believe it is due to the different growing conditions, milling processes, or the specific variety of spelt. It can also make a difference based on how long you ferment the bread and what you have in the starter. I believe I used flour from Bluebird grain farms when I took the photos in this post. I also tend to primarily use a starter with all-purpose flour.
Hi Dahn
I love this recipe, thank you!
I would like to make this bread as a “normal” bread loaf shape in a rectangular tin if that makes sense. But I dont know how to shape the dough for this?
Thanks!
/Sam
Oh sure. You will get either 2 small loaves in 8 x 4 inch bread pans or you can make a larger loaf with a few dinner rolls on the side. Just roll the bread dough into a log and place it in a greased bread pan. Thanks for the question.
1 cup isn’t 240 grams. It’s a little over 137 grams. Is there any reason the recipe says 240 grams?
Thanks for the comment. I use the measurement standards from King Arthur for all our ingredient weights. A sourdough starter that has 100% hydration will vary slightly in weight but it is generally 230 grams to 240 grams for one cup. It’s pretty close the the same weight as one cup of water.
Do you have started receipe and can you make start usinv spelt or other ancient grain? What size dutch oven? Does ceramic quoted dutch oven work?
Hi Safia, use a 6 quart Dutch oven for this recipe. Yes a ceramic coated Dutch oven will work just fine.
I MADE MY OWN STARTER AND BREAD BUT CAME OUT FLAT AND DINDNT RISE WHY DID THIS HAPPEN
There are quite a few reasons why sourdough bread might not rise as expected. It’s a bit of a science experiment, so a lot of elements need to align. Here are a few potential culprits: 1. Starter Strength: A strong starter is essential for a good rise. Make sure your starter has been fed and is bubbly and active before you begin your bread-making process. 2
Temperature: Sourdough is sensitive to temperature. Too cold, and the yeast activity will slow down; too warm, and you could kill the yeast. Aim for a room temperature around 75°F (24°C) for optimum fermentation. 3 Bulk Fermentation Time: Did you give the dough enough time to ferment? Sometimes it may need a bit longer than you’d think, especially if your kitchen is cooler than average.
I TRIED TO FOLLOW ALL THE STEPS BUT FOR SOME REASON IT DIDNT RISE
I left a more detailed explanation in your other comment but here are a few things to consider: Starter Strength, Temperature, and Bulk Fermentation Time.
Hello, this will be my first attempt making bread. Your recipe calls for 4 1/4 to 5 1/4 cups of flour. Can you please clarify why such a wide range in the amount? Do I start with 4 1/4 cups and add as needed?
Great question! Bread making is both an art and a science, and the amount of flour you might need can vary due to several factors. One of the primary reasons is humidity. On more humid days, you might find that you need less flour than on drier days. The type and brand of flour can also influence its absorption rate. For those new to bread making, using a slightly higher amount of flour can make the dough easier to handle. However, it’s worth noting that this can result in a denser loaf. I suggest starting with 4 1/4 cups of flour and then gradually adding more until you achieve the right dough consistency. The dough should be tacky to the touch but not overly sticky. Bread making can sometimes involve a bit of trial and error, but with practice, you’ll find the balance that works best for you.
@Dahn Boquist, Thank you for the quick reply! I will let you know how things work out.
You’re welcome. I hope you enjoy the bread.
Can I use white spelt flour?
Yes, you may need to add a bit more flour. You can adjust the flour as you knead the dough and add more if needed. The bread will rise a bit higher with white spelt. Enjoy!