
This post may contain affiliate links. Please read our disclosure policy. As an Amazon Associate, I earn from qualifying purchases.
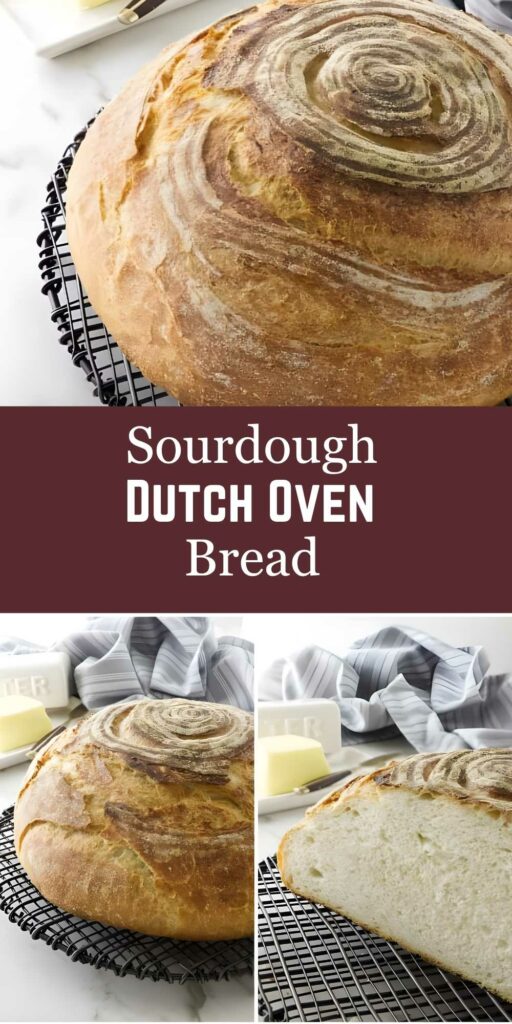
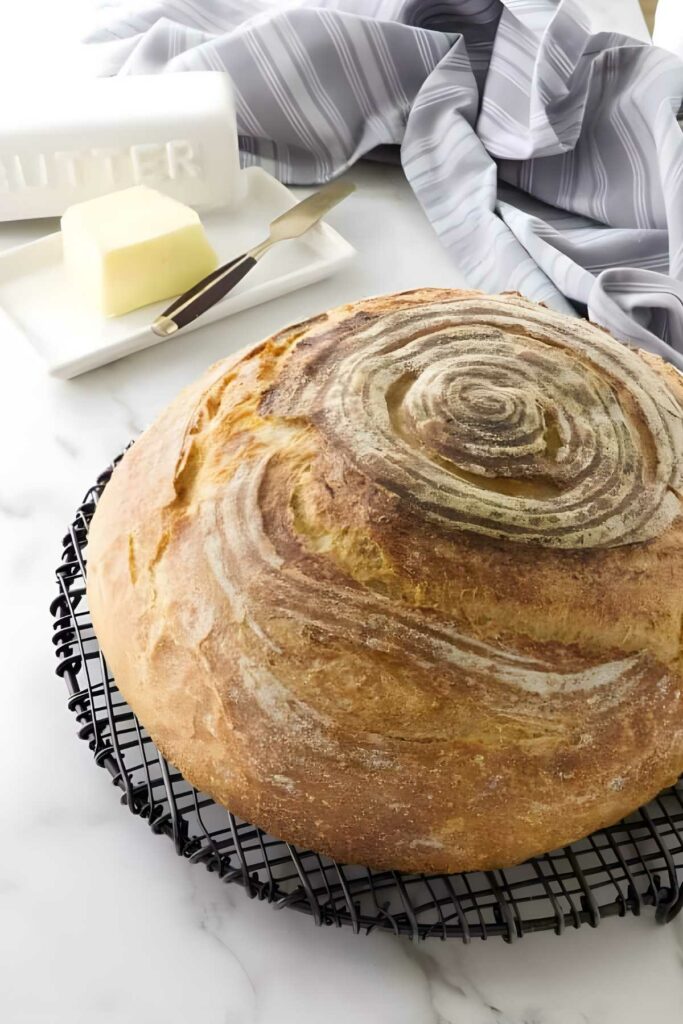
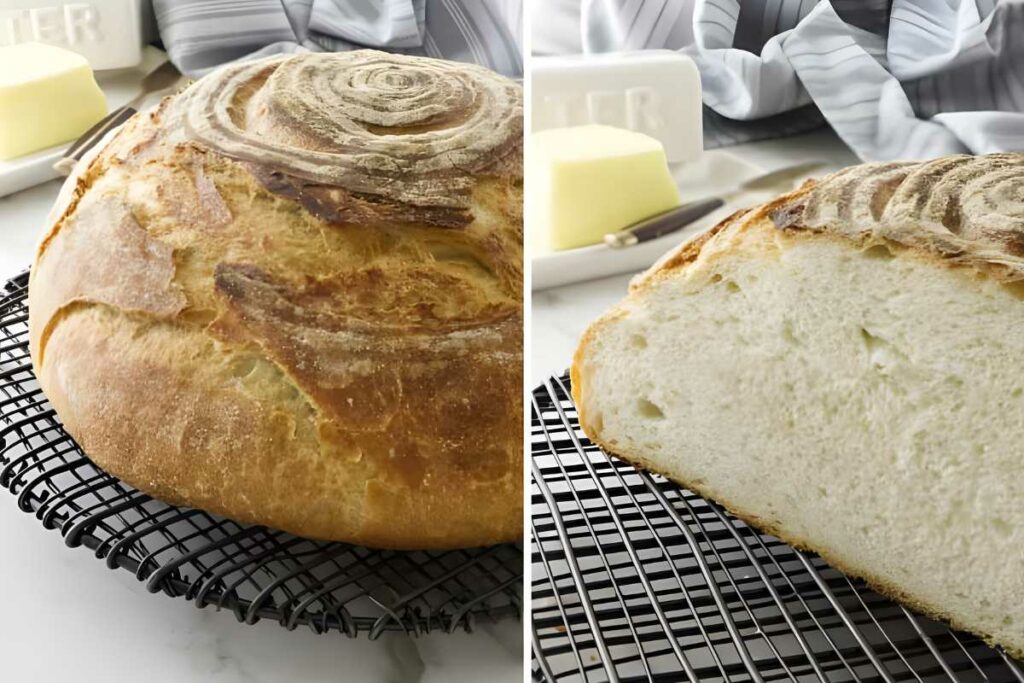
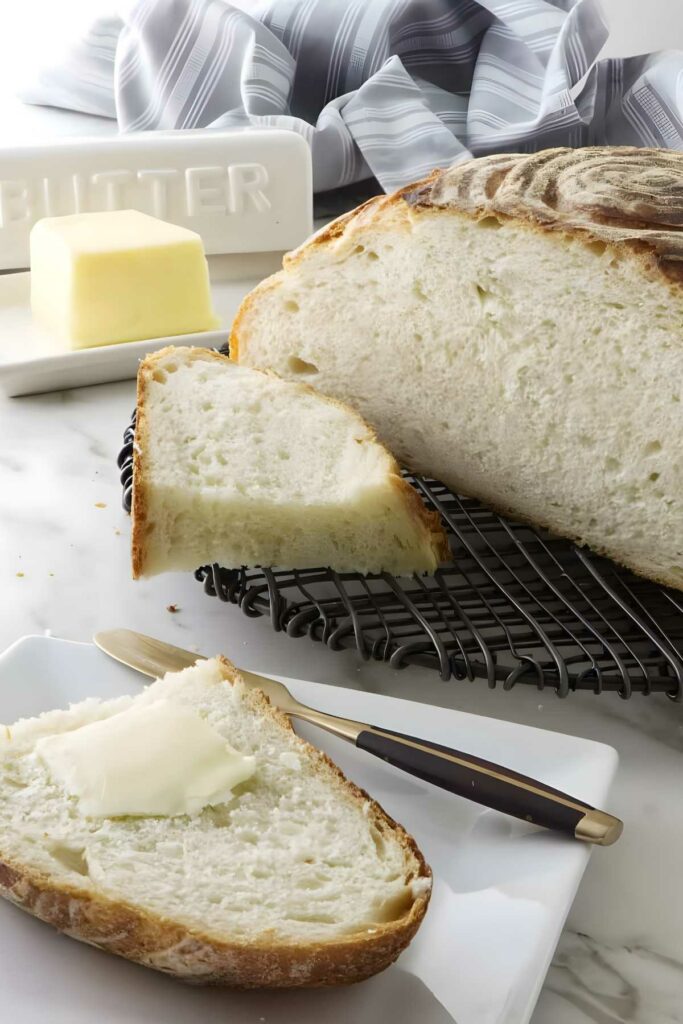
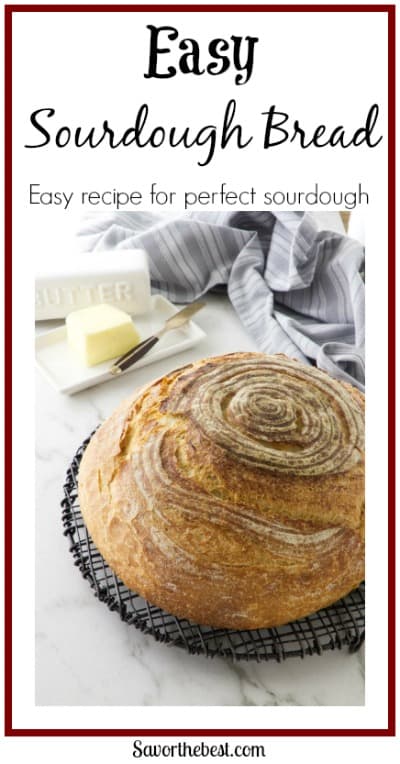
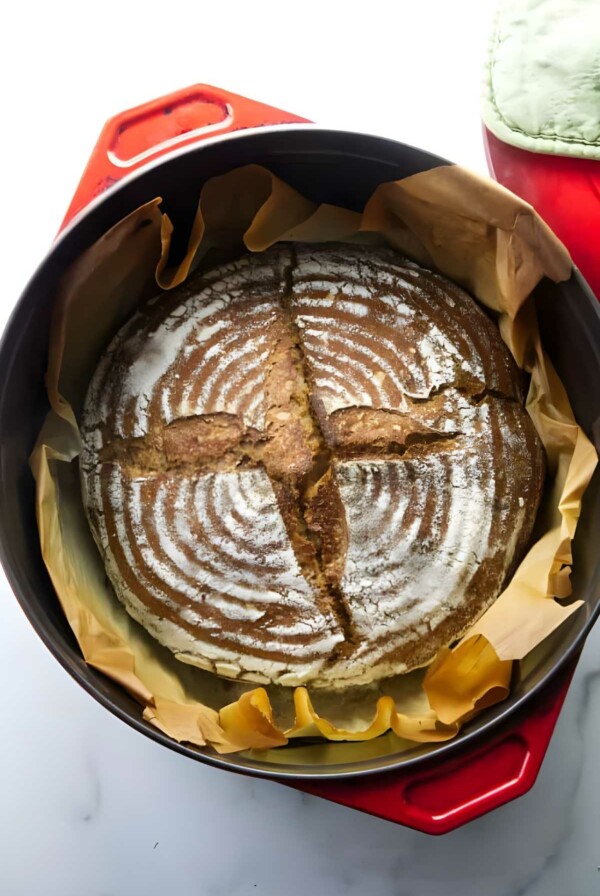
This rustic sourdough bread bakes up with a crisp, blistered crust and a chewy, open crumb. No fancy techniques required. A long, slow fermentation builds complex, well-developed flavor, while the Dutch oven traps steam for that golden artisan finish. With just four ingredients and a little planning, you’ll get a loaf that looks and tastes like it came from a bakery
Looking for a version made with ancient grains? Try our Einkorn Sourdough Bread for a nutty, flavorful twist.
Here’s Why This Sourdough Bread Recipe Works
A Dutch oven creates its own steam chamber, helping the loaf rise fully and develop a crisp, crackling crust.
Long fermentation builds better flavor. A slow rise (especially overnight) develops complexity without pushing the dough into sharp sourness.
Sticky dough makes great bread. This high-hydration dough can be a little messy, but it’s worth it. The extra moisture helps create an open, chewy crumb.
Stretch and fold, or knead if you prefer. A few quick folds during the first rise are all it takes to build structure. But if you’re more comfortable with traditional kneading, we’ve included notes for that method too.
For a sweeter way to use your sourdough starter, these Sourdough Raised Donuts are soft, pillowy, and downright irresistible.
Recipe Tips
Weigh your ingredients. Measuring flour by volume can swing wildly. Using a scale keeps your hydration consistent and your dough predictable.
Handle sticky dough with wet hands. This dough is higher in hydration and a bit sticky. A quick splash of water on your hands makes shaping easier.
Dust proofing baskets with a rice flour blend. All-purpose flour tends to stick. A 50/50 mix of rice and AP flour creates a drier surface that helps the dough release cleanly.
Preheat your Dutch oven. You can bake in a cold pot, but a fully preheated Dutch oven gives you better oven spring and a more dramatic rise.
Watch the dough, not the clock. Rising times vary with temperature and starter strength. Instead of timing it strictly, look for dough that’s puffy and slightly jiggly before baking.
Use leftovers to make my sourdough French toast that uses discard as well as sourdough bread.
Rustic Sourdough Bread
This is the kind of bread that reminds you why baking from scratch is worth it.
The crust sings, the crumb is open and chewy, and the flavor runs deep. You don’t need fancy tools or a complicated routine, just patience, good ingredients, and a Dutch oven.
Pin this now to find it later!
Pin It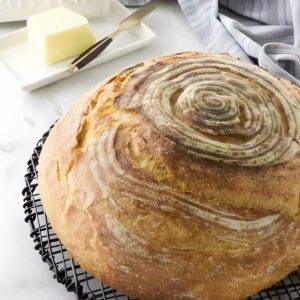
Easy Sourdough Bread Recipe
If you make this recipe, please leave a star rating and comment.
Ingredients
- ⅔ cup active sourdough starter, (160 grams)
- 1⅓ cups warm water, (314 grams)
- 4¼ cups all-purpose flour, (510 grams)
- 2 teaspoons salt, (12 grams)
Instructions
Mix the dough
- In a large bowl, combine the sourdough starter, warm water, flour, and salt. Stir with a spatula or your hands until no dry spots remain. The dough will be sticky and shaggy. Cover the bowl with a damp towel or plastic wrap and let it rest for 30–45 minutes.
Stretch and fold and Bulk Rise
- After the rest, perform the first stretch and fold: with wet hands, grab one side of the dough, stretch it upward, and fold it over the center. Rotate the bowl and repeat 3 more times for a total of 4 folds.
- Repeat this process 2 more times, spaced 30 minutes apart, for a total of 3 rounds. After the final fold, cover the bowl and let the dough rise at room temperature until puffy and nearly doubled in size, about 4 to 6 hours, depending on the temperature.
Shape and proof
- Turn the dough out onto a lightly floured surface. Gently shape it into a round by folding the edges toward the center and flipping it over. Use your hands or a bench scraper to tighten the shape slightly.
- Place the dough seam-side up in a floured proofing basket or towel-lined bowl. Cover and refrigerate for 8 to 12 hours for a cold fermentation that develops more flavor and makes scoring easier.Short on time? You can skip the fridge and let the shaped dough rise at room temperature for 1 to 3 hours, or until it looks slightly puffy and airy. See the note below about signs that the bread is ready to bake.
Score and bake
- Place a Dutch oven with the lid on into the oven and preheat to 475°F. Let it heat for at least 30 minutes to ensure the pot is thoroughly hot.
- Remove the dough from the fridge and invert it onto a sheet of parchment paper. Score the top with a sharp knife or lame.
- Carefully transfer the dough (on the parchment) into the hot Dutch oven. Cover and return it to the oven. Lightly spritz the surface of the dough with water. This encourages extra steam in the pot and helps create a crisp, blistered crust.
- Bake covered for 20 minutes, then uncover and bake for another 20–25 minutes, or until the crust is deep golden and crisp. Transfer to a wire rack and let the loaf cool completely before slicing.
Notes
Nutrition
Nutrition information is automatically calculated, so should only be used as an approximation.
 Like this recipe? Rate & comment below!
For a reminder of the true Bread of Life, read John 6:35. If you’re hungry for more than bread, this verse is worth a pause.


HI there,
I’m new to sourdough. I’m having trouble in that the dough is still too sticky after the first rise, and I can’t form it into a loaf for the second rise. It’s still pretty sticky after the second rise. Any tips or tricks? I have a superhero starter, and it floats. I use the starter before the morning feeding. I’m using all purpose flour, and a colander for proofing. The bread turns out pretty good, just flatter than I’d like.
Thank you in advance for any help you can offer!
There are a few reasons that the dough may still be too sticky. It is possible that the dough was over-proofed. That actually sounds like it may be your issue. However, sometimes it is a matter of developing your skills with handling the dough. Another trick you could try is to stick the dough (while still in the colander) in the fridge for the last couple of hours before you are ready to bake it. Colder dough will hold its shape better when you tip it out of the colander. If you try that tip then just proof and rise it like normal but use the fridge for the last couple of hours to get a bit of a chill to the dough. It will require a bit more bake time if you do that
Thank you! I’ll give it a try!
good luck!!
I ended up letting the just combined ingredients rest for 30 minutes before kneading the dough for a longer period of time (15 minutes) with my stand mixer. I reduced the proofing times. I stretched the dough during the first proofing every hour and only proofed for 4 hours. The second proof was for 1 hour. The dough held its shape and produced a great loaf, except I under cooked it! My oven is old and doesn’t seal all the way so I’ll need to figure this out. All I have is time right now to try to get this better! I wish I could send you a picture of it. Thank you for your advice and for a great recipe!!!
That’s great, I’m so glad it worked out better. Darn that bum oven seal! But you are right, the more you do this, the better you will get. You just gotta figure out how to adjust the timing for your oven. You got this!
I used all of the starter to make 2/3 cup. I don’t this bread will go well today. Very disappointed.
If you use all of your starter then you will not have any for future recipes. 🙁 If you don’t have enough starter for the recipe AND for a little extra to keep the starter going then you should feed the starter to build it up a bit more. Always build your starter up BEFORE you make a recipe. If you do that then you will have sourdough starter for a lifetime.
I saw a couple of comments about tests for the starter. How do I know if it is ready? A friend gave me some starter and I kept it in my fridge for a couple of months, recently have been feeding it on my kitchen counter to try to “revive” it. One container is very full of bubbles and contents are stretchy, the other may have gotten too much water or flour and bubbles are still small. Both smell sour but neither has doubled in size. I am considering throwing out the container with the small bubbles. What would you do at this point?
I would keep them both and keep feeding them regularly. I would even try making a batch of bread and see how it turns out. It is possible that you may need to let them ripen a little longer. Generally, you know the starter is ready when it is doubled in size. That can take anywhere from 4 to 6 or 8 hours depending on your starter and your kitchen. If one of the batches looks like it has too much water then add some more flour to it until it looks like it has the right consistency. You don’t have to be super precise.
When you let it raise in the proofing basket, do you cover it or leave it uncovered?
Cover it with a piece of plastic wrap that has oil on it. That way the plastic will not stick to the dough
I am also new to sourdough. When the recipe calls for sourdough starter, is that referring to starter before or after it has been fed?
The best time to use the starter is after it has been fed and is almost doubled in size. If you are new to sourdough then start with that guide. I have a really strong starter …she has been around for several years and the old girl is pretty strong 😉 With a strong starter you can get by with using it just about any time, un-fed or fed. But the best results will always be at the peak of feeding.
I followed the recipe very closely. My bread was dense and not as fluffy as I wanted it to be. What am I missing? Any suggestions to get it to be more fluffy and airy.
The time you give it to rise is pretty variable from kitchen to kitchen. Make sure it doubles in size before you bake it. Another issue could be the strength of your starter. If your starter isn’t established and strong then it may need a few more weeks to mature. If you have a young starter then you can always add a teaspoon of yeast to the recipe until your starter is more established.
I weighted my ingredients and my dough was dry and crumbly. I added more water and starter. The dough feels tough. Suggestions?
There are definitely variables in sourdough baking. Some starters have more hydration so you kind of have to go by ‘feel’. Go ahead and add more water until you have the right consistency. Even if the dough is a little too wet, that is better than having a dry crumbly dough
Is it all right if I mix and knead in a stand mixer. My KitchenAid had spilled me so I’m not a huge fan of going by hand lol
Yes, most hand mixers have dough hook attachments for that purpose. I would definitely recommend using the dough hook.
Would it be okay to use bread flour for this recipe?
Yes, bread flour works great in this recipe, thanks for asking
I was wondering about this too. Would you recommend using a combination of both or just one kind? I’ve tried this recipe with all purpose and thought it turned out great, but I recently bought some bread flour and thought I would try it this time
Bread flour works great with this recipe. I wrote the recipe for all-purpose flour because of requests however bread flour can be substituted for the all-purpose flour. You will probably find that the bread gets a better rise when you use bread flour. You can use it in any ratio from just replacing a cup to replacing all of the all-purpose flour with bread flour. I think you will like this quite well with bread flour.
Hi! For the first rise I put my dough in the fridge and got it out to punch down and it was really dense…. any idea what the problem is? I’m hoping it will be okay as I’m letting it do it’s 2nd rise in the proofing basket???
Cold dough is always firmer. As long as your starter is good, it will soften up and rise a bit more after you take it out of the fridge. Depending on you cold your fridge is, your dough might take a bit longer.
I’d really like to try this recipe. I am fairly new to sour dough. I am also using Einkorn flour and am wondering if I could use
Einkorn for this recipe. And would I need to make any changes? Thanks so much.
Cheryl, I have a recipe for einkorn sourdough bread at this link. https://savorthebest.com/einkorn-sourdough-bread/