
This post may contain affiliate links. Please read our disclosure policy. As an Amazon Associate, I earn from qualifying purchases.
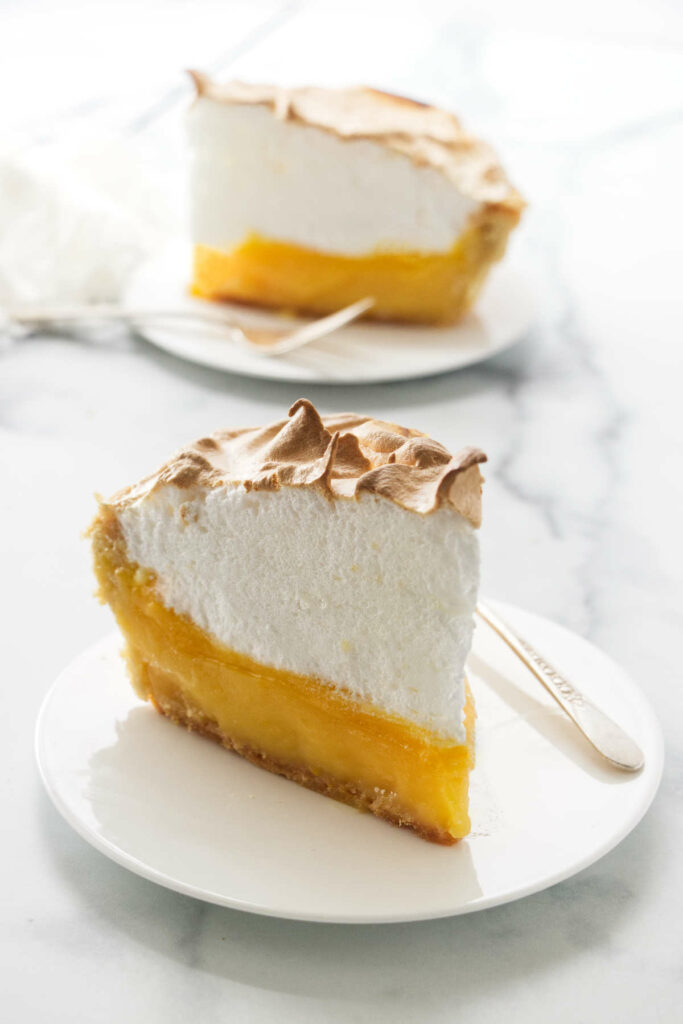
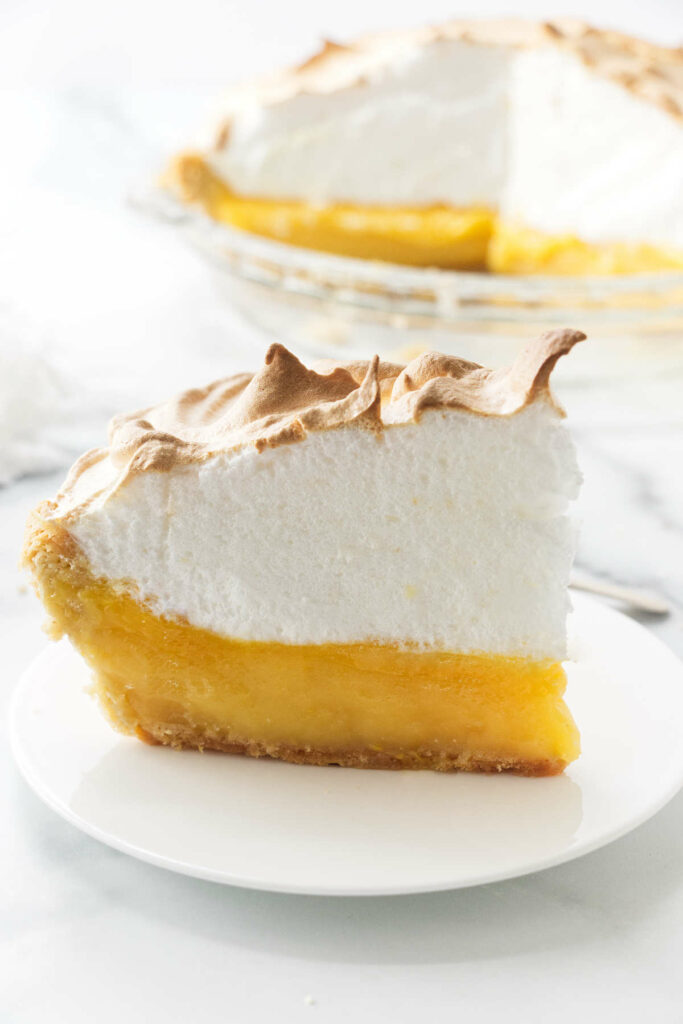
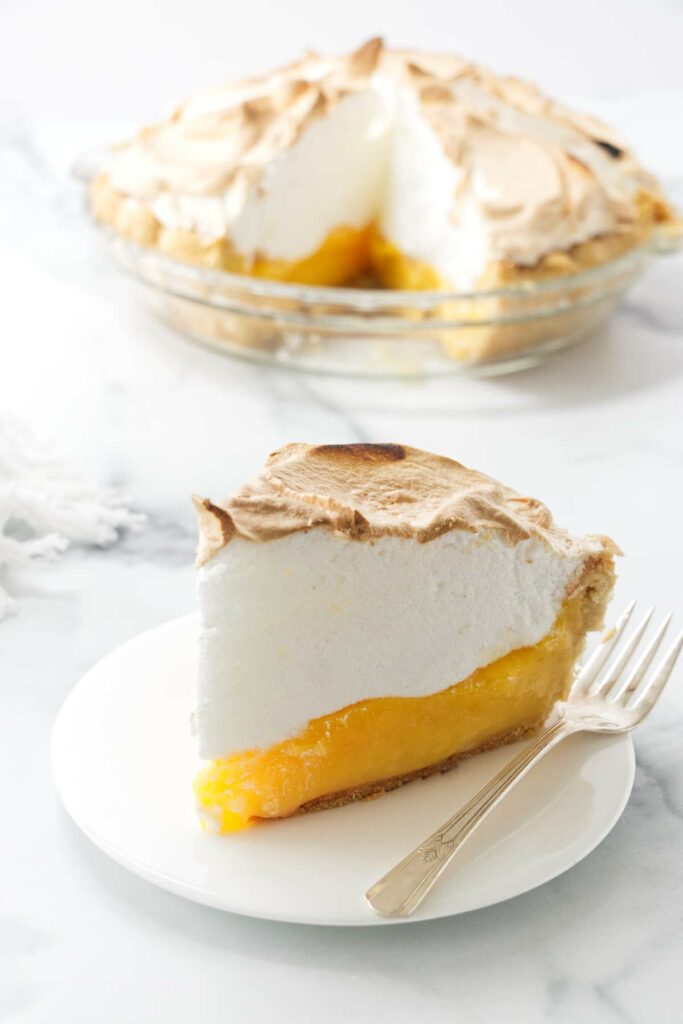
Get set for a twist on a classic with our Lemon Meringue Pie. It’s where traditional meets a zesty modern upgrade. We’re talking about a meringue that’s so high it could have its own weather system, and a lemon flavor that really packs a punch.
This isn’t just a run-of-the-mill pie; it’s a foolproof, flavor extravaganza that’ll have you questioning all your past pie choices. Ready to bring some serious zest to your dessert game?
If you like your lemon desserts with a little less fuss, these shortbread lemon bars are a simpler option with the same bright, tangy flavor.
Old Fashioned Argo Lemon Meringue Pie Recipe
What happens when you take the classic charm of an Argo Mile High Lemon Meringue Pie and blend it with the modern twists of Bon Appetit’s foolproof lemon meringue pie? You get a dessert that’s the best of both worlds.
This recipe started as a nod to the traditional Argo version, renowned for its reliable meringue topping that doesn’t weep, thanks to the clever use of Argo cornstarch. But then, a twist – by incorporating the Bon Appetit approach, we’ve upped the ante on the lemon flavor, making it brighter and more pronounced.
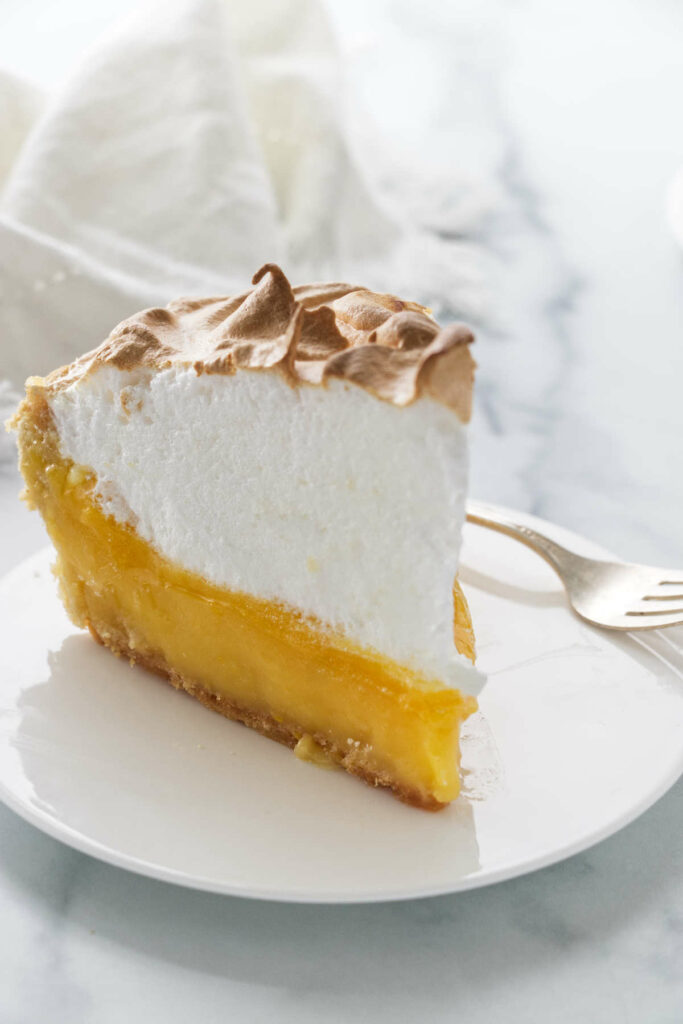
It’s a marriage of two great recipes, creating what might just be the perfect pie. This fool-proof lemon meringue pie brings together the towering allure of the mile high meringue with a tangy, zestful lemon filling.
Here is Why This Foolproof Recipe Works
This pie strikes a delightful balance, leaning more towards a vibrant tartness rather than being overly sweet, showcasing an exceptionally zesty lemon flavor.
- Lemon Flavor Boost: One of the secrets to the standout flavor of this pie lies in a simple yet effective technique. Rubbing the lemon zest into the sugar releases the fragrant oils hidden in the lemon zest.
- Rich Filling, Flawless Meringue: Using 6 egg yolks in the filling enriches its flavor and texture. Bonus: it leaves us with 6 egg whites for a perfect, mile-high meringue – efficient and delicious!
- Starch Enhanced Meringue: Adding starch to the meringue mixture helps soak up excess moisture and prevents weeping. You will still need to eat the pie within a day, as this old-fashioned way of making meringue isn’t as stable as an Italian or Swiss meringue.
- Optional fail safe meringue: For an absolute no weep, no fail meringue pie, you can top the pie with Italian meringue or Swiss meringue. Either of these options will allow you to make the pie a couple of days in advance because they make a more stable meringue.
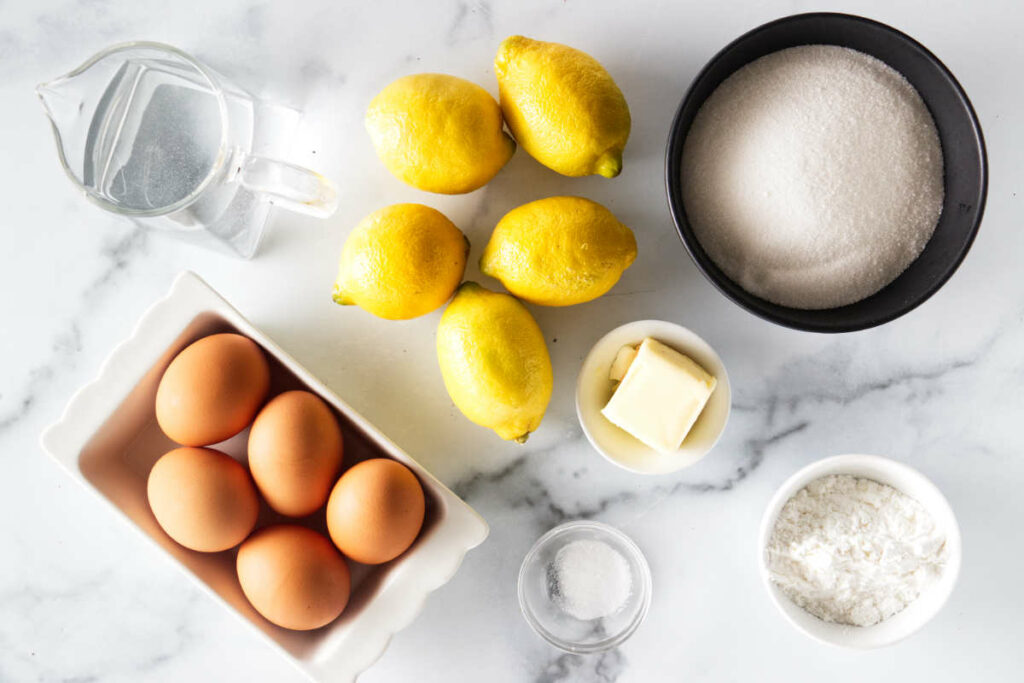
The Ingredients for the Tart Lemon Filling and Fluffy Meringue
Here is a list of the ingredients you will need for this recipe. Scroll down to the printable recipe card for all the details.
- Pantry: Sugar, Cornstarch
- Dairy: Butter
- Produce: Lemons (use the zest and juice)
- Other: Eggs. Separate the egg yolks from the egg whites
In this recipe, I’ve used Argo corn starch, a brand that holds a special place in my kitchen, as it’s the same one my grandma used. It’s familiar and trusted, a nod to the baking traditions passed down through generations.
Interestingly, Argo and Kingsford have merged, so depending on where you are, you might see it labeled as Kingsford. However, while I have a soft spot for Argo, any high-quality corn starch will work perfectly for this pie.
How to Make a Fool-Proof Lemon Meringue Pie
Here is a brief overview to get an idea of what to expect with the lemon pie recipe. Scroll down to the printable recipe card for all the details.
- Prepare Lemon Filling: Combine sugar, corn-starch, and lemon zest; add water and egg yolks. Cook until the mixture bubbles and thickens, then add butter.
- Make Meringue: Beat egg whites until frothy then add sugar and corn starch and beat until stiff peaks form.
- Assemble and Bake: Pour filling into crust, top with meringue, and bake until golden.
Tips for Success
Here are some tips for making a perfect lemon meringue pie.
- Use care when you separate the eggs from the whites. If you get even a speck of yolk in the whites, the whites will not whip.
- Before you make the meringue, start with a spotlessly clean bowl and beaters. Even a hint of greasy residue or egg yolk can interfere with the egg whites whipping into a meringue. Additionally, opt for a glass or metal bowl since a plastic bowl can harbor grease residues.
- When you cook the filling, heat it gently and whisk constantly to prevent lumps and ensure a smooth texture.
- Pre-bake your pie crust before preparing the filling. If you have the crust ready, you can pour the hot filling into the pre-baked crust. Then immediately start making the meringue so you can add the meringue while the pie filling is still warm. This allows the layers to ‘seal’ and prevents shrinkage.
- While you can make this pie with bottled lemon juice, fresh lemons are crucial for achieving that vibrant flavor. Fresh lemons not only provide the juice but also the zest, which, when rubbed into the sugar, enhances the lemon essence and flavor in the pie.
- For a perfectly crisp crust, use a metal pie pan when you par bake the tart crust.
- When preparing the lemon filling, use a non-reactive pan (like stainless steel or glass). This will prevent any reaction with the lemon’s acidity, preserving the color and preventing a metallic taste.
Tips to Make the Lemon Filling in Advance
Every meringue pie comes with its quirks, primarily because meringue tends to attract moisture, a particularly pronounced challenge when stored in the fridge. However, refrigeration is essential to keep the pie fresh and safe to eat.
If you want to make this pie more than 8 hours in advance and still have the meringue look perfect, make the lemon filling in advance and chill it in the baked pie crust (cover it with plastic wrap). Store the pie without the meringue for up to 3 days, then top it with an Italian meringue right before serving the pie.
Here’s why Italian meringue is the ideal choice for advance preparation:
- No Need for Warm Filling: Unlike traditional meringue, which requires spreading over a warm filling to seal properly, Italian meringue can be added to a cooled filling.
- Stability: It is more stable and resilient. It holds up well over time, which means it won’t weep or lose its texture as quickly as other types of meringue.
- Longer Shelf Life: Made by whipping hot sugar syrup into egg whites, this type of meringue is more resistant to humidity and temperature changes.
- Versatile and Forgiving: If you have to transport the pie or it sits out for a while during an event, it is less likely to deflate or become soggy.
Storing the Pie
Meringue can be finicky when it comes to maintaining its perfect texture and appearance. Here are some tips to ensure your lemon meringue pie stays fresh and beautiful.
- Allow the pie to cool completely at room temperature for at least 1 hour before transferring to the refrigerator. This step will prevent condensation from forming which could make the meringue weepy.
- Store the pie in the refrigerator for up to 2-3 days. It is best eaten within one day because meringue attracts moisture in the fridge and quickly starts to break down.
- Freezing is not recommended for lemon meringue. The freezing and thawing process will alter the texture of the meringue.
- You can freeze the pie if you do not add the meringue to the top, then add a cooked Italian meringue when it thaws.
Pin this now to find it later!
Pin It
Lemon Meringue Pie
If you make this recipe, please leave a star rating and comment.
Ingredients
- 1 recipe single pie crust, or a store-bought pie crust
- 1 ¼ cups granulated sugar
- 5 tablespoons cornstarch
- ¼ teaspoon salt
- 1 tablespoon lemon zest
- 1 ¼ cups water
- 6 egg yolks, save the whites for the meringue
- 1 cup fresh lemon juice
- 3 tablespoons butter, cold
Meringue
- ¾ cup granulated sugar
- 2 teaspoons cornstarch
- 6 egg whites
- ¼ teaspoon salt
Instructions
If You are Making a Homemade Crust:
- Roll the pie dough into a circle and transfer it to a pie dish. Trim the excess dough and crimp the edges.
- Prick holes in the bottom of the crust with a fork then stick the pie crust in the freezer for 20 to 30 minutes to get cold and firm. Preheat the oven to 400°F while the crust is chilling.
- Line the pie shell with parchment paper and fill it with pie weights. Bake for 10 to 15 minutes then remove the pie weights and continue baking for another 10 to 20 more minutes or until the crust is golden brown.
- Transfer the pie shell to a cooling rack.
- Reduce the oven temperature to 350°F.
For the Filling
- Whisk the sugar, cornstarch, and salt in a medium saucepan until combined and the cornstarch is well distributed into the sugar. Add the lemon zest and use your fidngers to rub the lemon zest between your fingers. This will release the oils in the zest and enhance the lemon flavors.
- Add the water and whisk until well blended. Whisk in the egg yolks, and lemon juice.
- Gently heat the mixture over medium heat, stirring continuously until the mixture starts to bubble and thicken. Take your time with this step, it should take about 8 to 10 minutes. Reduce the heat to a gentle simmer and simmer for 3 minutes, stirring constantly.
- Remove from heat and add the butter, stirring until completely melted.
- Pour the hot filling into the pre-baked pie crust.
- Move the oven rack to the lowest position and preheat the oven to 325°F.
Basic Meringue
- Place the sugar and cornstarch in a small bowl and whisk to combine.
- Add the egg whites and salt to a large mixing bowl. Beat on high speed until the whites get foamy. Slowly start adding the sugar, 1 tablespoon at a time and continue whipping until they reach stiff peaks.
- Spread the meringue on top of the warm lemon filling (the warm filling helps seal the meringue to the pie). Make sure you spread it all the way to the edges and use the back of a spoon to add some swirls.
- Bake on the lowest rack at 325°F for 20 to 25 minutes until the meringue reaches a light golden brown.
- Let the pie cool on a rack for 1 hour then chill it in the refrigerator for at least 4 hours before serving.
Notes
- When separating the egg yolks from the whites, be sure to crack the eggs carefully. Even a small amount of yolk mixed with egg whites can prevent them from whipping up properly. It’s best to separate each egg in a small bowl before adding to the larger batch, just in case a yolk breaks.
- For the best flavor, really work the lemon zest into the sugar with your fingers. This action helps to release the essential oils from the zest, enhancing the lemony aroma and taste in your pie.
- Keep the heat medium and whisk continuously while cooking the lemon filling. This prevents the eggs from scrambling and ensures a smooth, thickened mixture.
- For a stable meringue, add the sugar to the egg whites gradually, one tablespoon at a time. This allows the sugar to dissolve properly, resulting in glossy, stiff peaks. Don’t overwhip them or they will collapse easily.
- Spread the meringue while the filling is still warm. This helps to seal the meringue to the pie and prevents it from shrinking away from the crust during baking.
- Bake the pie on the lowest rack in your oven. This position helps cook the meringue thoroughly without over-browning the top. Since the meringue in this pie is so tall, it will cook more thoroughly at a lower temperature. Raise the heat during the last few minutes in order to give it a deeper brown color.
- Allow the pie to cool gradually. Rapid temperature changes can cause the meringue to weep. After cooling on a rack for an hour, chill in the refrigerator for at least 4 hours to set completely before serving.
- If you want to make the pie more than eight hours in advance, make the filling and chill it in the crust for up to 3 days. Top the pie with an Italian meringue which is more stable and can be spread over a cold filling.
Nutrition
Nutrition information is automatically calculated, so should only be used as an approximation.
 Like this recipe? Rate & comment below!


Can you update ingredients for filling recipe to include both the cold water and the boiling water. A little thing but as both are necessary ingredients, feel they should be included. The recipe looks good and I plan to make it for company lunch tomorrow. I know it should be made and eaten same day ( every day if my waistline would not object) but tie is a factor so will set my alarm to make first thing 5 a.m. I have gone through numerous recipes and debated cornstarch vs no cornstarch but your wonderful stories and my remembrances of my mum using cornstarch made me decide on your recipe. I don’t think I will be disappointed.
Hi, Taylor….Thanks for the catch, I added the water to the ingredient list. Hope you enjoyed the pie! 🙂
One of my favorite desserts, looks delicious!
Hi, Sharon….welcome to our site! Thanks for your comments… I love lemon in just about anything. 🙂
I love this pie! After Key Lime, it’s my favorite. This looks so terrific — really good job. Thanks.
Thanks for your encouragement, John…it is delicious. 🙂
Lemon meringue is one of my favorites! and oh darn it it all needs to be eaten day 1 🙂 looks gorgeous!
Thank you, Susan. 🙂
Hahaha! I love the pink lemonade meringue story. That sounds like something I might do. I’m always doing something clutzy. I haven’t had lemon meringue pie in forever, but man it sounds good.
Hey, thanks for your comments, Amy! It was a delicious lemon meringue pie….If you bake one, just remember to eat the whole thing the same day you bake it….yum 🙂
Hi, Amy….So happy you enjoyed the pie 🙂 I love the idea of a rainbow lemon meringue pie, perfect for Springtime and the Easter egg colors.