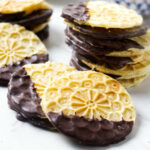
Crisp Italian Pizzelle
Crisp, buttery pizzelle dipped in smooth semisweet chocolate. This easy batter mixes up in minutes and cooks fast in a pizzelle iron. No chilling needed, just classic Italian cookies with a modern (and chocolatey) twist.
Servings: 50 mini pizzelle
Equipment
- mini pizzelle maker
Ingredients
- 3 large eggs
- ¾ cup granulated sugar 150 grams
- ¾ teaspoon salt
- 2 teaspoons vanilla extract
- 1 ¾ cups all-purpose flour 210 grams
- 2 teaspoons baking powder
- 8 tablespoons butter melted and slightly cooled, 113 grams
For dipping
- 6 ounces semi sweet chocolate chopped
Instructions
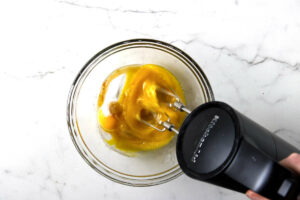
- Mix the base. In a large bowl, beat the eggs, sugar, salt, and vanilla until everything looks smooth and evenly blended.
- Stir in the flour and baking powder. Mix until the batter is smooth with no dry pockets.
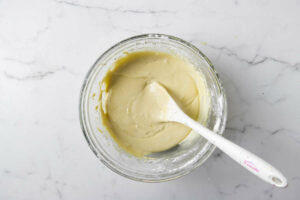
- Pour in the melted butter and mix until smooth. The batter will thicken a bit as it rests, so by the time your iron is hot, it should be scoopable rather than pourable.

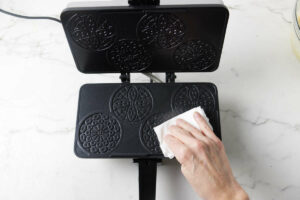
- Preheat the pizzelle maker. Preheat your pizzelle iron until it’s fully heated. If your iron needs greasing, lightly wipe the plates with a paper towel dipped in a bit of vegetable oil. You want a thin, even sheen. Re-grease as needed between batches if you notice sticking.
- Portion the batter. Use a small scoop or measuring spoon so the cookies come out evenly. For mini pizzelle, use about 1 tablespoon of batter per cookie; for standard irons, start with about 2 tablespoons. The exact amount can vary by iron, so make a test cookie first and adjust as needed. Close the lid gently and avoid peeking too soon.
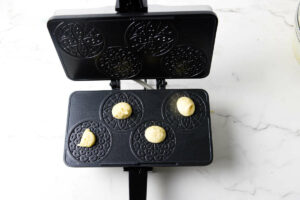
- Cook until lightly golden. Timing will depend on your pizzelle iron, so treat this as a general guide. Most pizzelle take anywhere from about 35 seconds to 2 minutes to cook. Start with a test cookie to figure out the sweet spot for your specific iron. You’re looking for a light golden brown color with a clearly defined pattern. If the pizzelle come out too pale, give them a little more time. If they’re browning too quickly, lower the heat or shorten the cooking time.
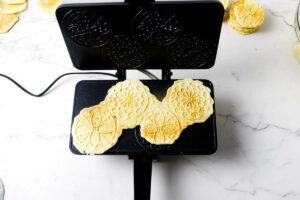
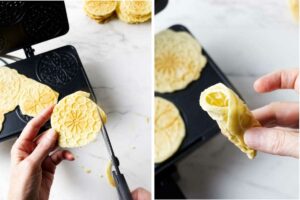
- Cool. Lift the pizzelle off and lay them flat on a rack to cool. If any batter spilled past the pattern, use scissors to trim the edges. They crisp up as they cool, so don’t judge the texture straight off the iron. If you want to shape them (cones, bowls, curls), do it immediately while they’re still warm and flexible.
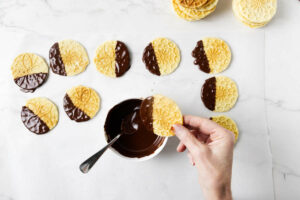
- Dip in chocolate. Melt the chocolate gently (microwave in 20–30 second bursts, stirring between zaps). Dip the edge of each cooled pizzelle into the chocolate, let excess drip off, then set on parchment. Let the chocolate set at room temp until firm.
Notes
Pre-heating the pizzelle iron: Heat the iron according to your specific model’s instructions. They’re not all the same, and the manual wins over everything I say here.
Storage. Pizzelle are at their best the day they’re made and will be crisp and snappy. Store leftovers airtight up to 1 week or in the freezer for up to 1 month.
Freezing: Freeze them plain (before dipping) in an airtight container for up to 1 month. Thaw uncovered so they stay crisp.
Batter placement tip: Place the batter slightly off center, just a bit toward the back of the pattern. As the iron closes, it naturally pushes the batter forward, helping it land neatly in the middle.
Trim overflow while warm: It’s normal for some batter to spill past the pattern. Don’t stress, just trim the edges with scissors while the pizzelle are still warm. Remove one cookie at a time to trim, and leave the others on the open iron to stay soft and flexible until you’re ready for them.
Yield will vary by iron size: This recipe makes about 50 pizzelle using a mini pizzelle maker. With a standard-size iron, expect closer to 25–30.
Flavor swap options: For a twist on the vanilla flavor, try 2 teaspoons of anise extract for traditional flavor or lemon extract and some lemon zest for a citrus variation.
Nutrition
Serving: 1cookie | Calories: 68kcal | Carbohydrates: 8g | Protein: 1g | Fat: 3g | Saturated Fat: 2g | Polyunsaturated Fat: 0.2g | Monounsaturated Fat: 1g | Trans Fat: 0.1g | Cholesterol: 15mg | Sodium: 70mg | Potassium: 28mg | Fiber: 0.4g | Sugar: 4g | Vitamin A: 72IU | Calcium: 14mg | Iron: 0.5mg
