Gluten Free Pie Crust
This recipe makes a gluten free pie crust for a single or double crust pie. It tastes like traditional pie crust and no-one will know that it is gluten-free. A combination of butter and vegetable shortening make the dough easier to work with. Egg and sour cream give the dough structure and tenderness, while a pinch of baking powder helps puff the dough and gives it a flakier texture.
Servings: 8 Servings
Ingredients
Single Crust Pie
- 1-⅓ all-purpose gluten-free flour 166 grams
- ½ teaspoon salt
- ¼ teaspoon xanthan gum
- ¼ teaspoon baking powder
- 6 tablespoons cold butter
- 2 tablespoons vegetable shortening chilled
- ¼ cup sour cream
- 1 whole egg
- 1 to 4 tablespoons ice water
Double Crust Pie
- 2-⅔ all-purpose gluten-free flour 332 grams
- 1 teaspoon salt
- ½ teaspoon xanthan gum
- ½ teaspoon baking powder
- 12 tablespoons cold butter
- ¼ cup vegetable shortening chilled
- ½ cup sour cream
- 2 whole eggs
- 2 to 8 tablespoons ice water
Instructions
- Combine the flour, salt, xanthan gum, and baking powder in a bowl. Cut the butter into cubes and toss it into the flour mixture along with the vegetable shortening. Use a pastry blender (or you can use a food processor) to cut the butter into the flour. The mixture should look like coarse cornmeal with pea-size lumps.
- Stir in the sour cream and egg until well distributed into the flour mixture.
- Slowly drizzle the ice water into the mixture 1 tablespoon at a time. Stir the mixture with a rubber spatula after each addition of water. Continue adding water until you can form the dough into a ball.
- If you are making a double-crust pie, cut the ball of dough in half and shape each half into a disk.
- Wrap the dough in plastic wrap and let it chill in the fridge for at least 30 minutes.
To roll the dough out:
- When it is time to roll the dough, let it rest on the counter for 20 to 30 minutes if it is too cold to work with.
- Place the dough on a floured counter. Dust the top of the dough and the rolling pin with more flour.
- Roll the dough into a 12-inch circle. Lift and turn the dough as you roll, keeping the dough lightly dusted with flour.
- Wrap the dough around your rolling pin to transfer it to a pie plate (alternatively, you can slide a thin cutting mat under the dough to lift and transfer it).
- Gently ease the dough into the pie dish by lifting the edges and allowing the dough to fall into the dish without stretching it (if you stretch the dough, it will shrink when you bake it).
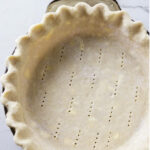
- Trim and crimp the edges of the dough. Use a fork to prick holes in the bottom of the pie shell if you plan to pre-bake the crust.
To pre-bake the pie crust:
- Place the pie shell in the freezer for 30 minutes or in the fridge for 1 hour or until it gets firm and cold.
- Preheat the oven to 400°F
- Line the pie shell with parchment paper and fill it with pie weights.
- For a partially baked crust, bake for 8 to 12 minutes then transfer to a cooling rack and remove the pie weights.
- For a fully baked crust, bake for 8 to 12 minutes then remove the pie weights and continue baking for another 10 to 17 more minutes or until the crust is light golden brown (Optionally, you can leave the pie weights in the shell for the entire baking time, however, the crust will not get quite as brown).
- Transfer the pie shell to a cooling rack and let cool at room temperature.
Notes
- Gluten-free pie dough requires a tad bit more liquid than pie crust that is made with conventional flour. You don’t have to worry about the water making the crust tough since there is not any gluten. However, you don’t want the dough to be sticky. If you add too much water and end up with a sticky dough, just sprinkle in some extra flour.
- Depending on what brand of flour you use, you may need to adjust the amount of water to get the dough to form into a ball. Different brands of gluten-free flour have different combinations of flour blends which will affect how much liquid gets absorbed.
- Xanthan gum is optional but will help make the pie dough a bit easier to handle.
- If you use a flour blend that has whole grains in the blend, the dough will be slightly more delicate to handle. We recommend using a flexible cutting mat to transfer the dough. After you roll the dough out, sprinkle some flour on the cutting mat and slide it under the dough. Lift the mat and hold it over the pie plate then slide the dough off the mat and let it fall into the pie plate.
- If the dough cracks when you transfer it to the pie plate, just pinch it together or patch it with extra dough.
- We found that over-baking the pie crust or not adding enough liquid resulted in a tough crust. If you pre-bake the crust, bake it until it is a light golden brown.
- We tested this recipe with the following flour blends. Cup 4 Cup, King Arthur Measure for Measure, and Better Batter all-purpose flour blend (all linked below).
Nutrition
Serving: 1 | Calories: 186kcal | Carbohydrates: 12g | Protein: 3g | Fat: 14g | Saturated Fat: 8g | Polyunsaturated Fat: 5g | Cholesterol: 52mg | Sodium: 228mg
