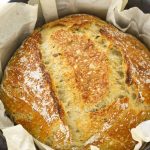
No-Knead Rosemary Bread
An easy No-Knead Rosemary Bread baked in a Dutch oven. This is a large, lofty loaf of artisan-style bread with a crunchy crust, a moist crumb that is infused with fresh rosemary leaves.
Servings: 1 loaf
Ingredients
- 4-½ cups 540 grams all purpose flour, or bread flour
- 1-½ packet 11 grams or 3 teaspoons Quick Rise or RapidRise instant yeast
- 2 teaspoons table salt 9 grams
- 4 tablespoons fresh rosemary leaves divided
- 2-¼ cups lukewarm water up to 120°F (338 grams)
Instructions
- Fluff up the flour before measuring or weighing; then add the flour, yeast, salt to a mixing bowl and stir to combine.
- Chop 1 tablespoon of the rosemary leaves and add them along with the whole leaves to the flour mixture, stir to combine.
- Make a well in the center of the flour mixture and pour the water in, stir to combine and no flour remains on the bottom of the bowl. The dough will be soft and sticky.
- Coat a large bowl with olive or vegetable oil; then transfer the dough into the bowl. (See Notes).
- Cover the bowl with a piece of oil-sprayed plastic wrap or parchment paper. Let rise for 1 hour in a warm area of the kitchen.
- When the dough has been rising for 40 minutes, place a 6-quart Dutch oven, with its lid, into the oven and set the oven temperature to 450°F.
- After the dough has risen for the full 1 hour, sift a light dusting of flour on a large piece of parchment paper and set aside.
- Tip the dough out onto a lightly flour-dusted surface. Use a bench scraper or spatula to turn and fold the dough 5 or 6 times to shape into a rough mound. Dust lightly with flour.
- Place the dough, folded side down, in the center of the reserved parchment paper. Dust the top of the mound lightly with flour.
- Using the parchment paper as a sling, lift the dough and set it into another bowl, cover with plastic wrap and let rise for 30 minutes (see Notes).
To Bake the Bread:
- Carefully transfer the hot Dutch oven from the oven to the countertop and remove the lid.
- Remove the plastic wrap from the dough. With a sharp knife, scissors or a bread taser blade, score the bread dough on the top with a slash or X, (see Notes).
- Again, using the parchment paper as a sling, lift the dough and carefully set it into the hot Dutch oven.
- Place the lid on the Dutch oven and transfer to the oven.
- Bake for 45 minutes, then remove the lid from the Dutch oven and bake the bread for an additional 12 to 15 minutes.
- Transfer the hot Dutch oven to the work area and using the parchment paper, lift the bread out and place on a wire rack. Let cool before slicing.
Notes
- The protein content in all-purpose flour is about 10 percent as compared to 12 percent in bread flour. If using bread flour, the water may need to be increased by 1/4 of a cup to compensate for the extra protein. If it looks like it needs more water, start with 2 tablespoons and add more if needed. The dough should be soft and sticky.
- Yeast will have an expiration date on the package, use within the date limit. Yeast should be stored in the refrigerator or freezer.
- The bread dough can be mixed and allowed to rise in the same bowl. It is optional to transfer the dough to an oiled bowl for the rise, however, the oil does make it less messy to transfer the dough from the bowl to the floured work surface.
- Placing the shaped dough and parchment paper into another bowl will keep the shape mounded during the final rise.
- Scoring on the top is not mandatory but doing so will allow the bread to expand and give it more height.
- Misting the top of the dough lightly with water before placing in the oven, will produce more steam and help the bread rise even higher.
- Bread baked in a Dutch oven works because the Dutch oven holds the steam in and helps the bread rise better. This produces a lofty loaf with a cracking crust. Do not leave the lid on the Dutch oven for the entire bake time or the crust will become too thick.
- To determine that the bread is cooked completely, tilt the bread on its side and thump on the bottom. It should sound hollow if done. You can further check the temperature with an instant-read thermometer. When the bread is done it will register 210°F when inserted in the top of the bread.
- This bread rises quickly because we use Rapid rise or Quick rise instant yeast. If you have regular instant yeast, you will need to let the dough rise for approximately 3 hours before you shape the dough. After you shape the dough, let it rise for approx. 1 hour. Times will vary depending on the temperature of your kitchen.
Nutrition
Serving: 1 | Calories: 79kcal | Carbohydrates: 16g | Protein: 2g | Sodium: 238mg | Fiber: 1g
